
Users, settings and backups
Give each person their own login and role, set up the store, tax, receipt, printer and limits, and keep the store's data safe with backups. This chapter also covers the audit trail, the health panel and the subscription screen.
Open the Admin screens
Who: Owner or Manager
Choose Admin in the menu. The owner sees seven tabs: Users, Settings, Audit, Backups, Export / import, Health and Subscription. On a phone the tabs scroll sideways.
A manager sees the same tabs without Users, and inside them only what a manager may do. Settings marked owner only are greyed out and the tax mode cannot be changed. There is no Restore on the Backups tab and no import on Export / import. On Subscription, only the owner can link the POS or press Check now. Cashiers and inventory clerks do not see Admin.
Tip: when the app refuses something, the message often ends with a code in brackets, such as (VR-503). Read it out when you call Chachi's. It names the exact rule.
Add a user
Who: Owner
Give every person who works in the store their own login. If people share one, every price change, discount and drawer count is recorded against the wrong name.
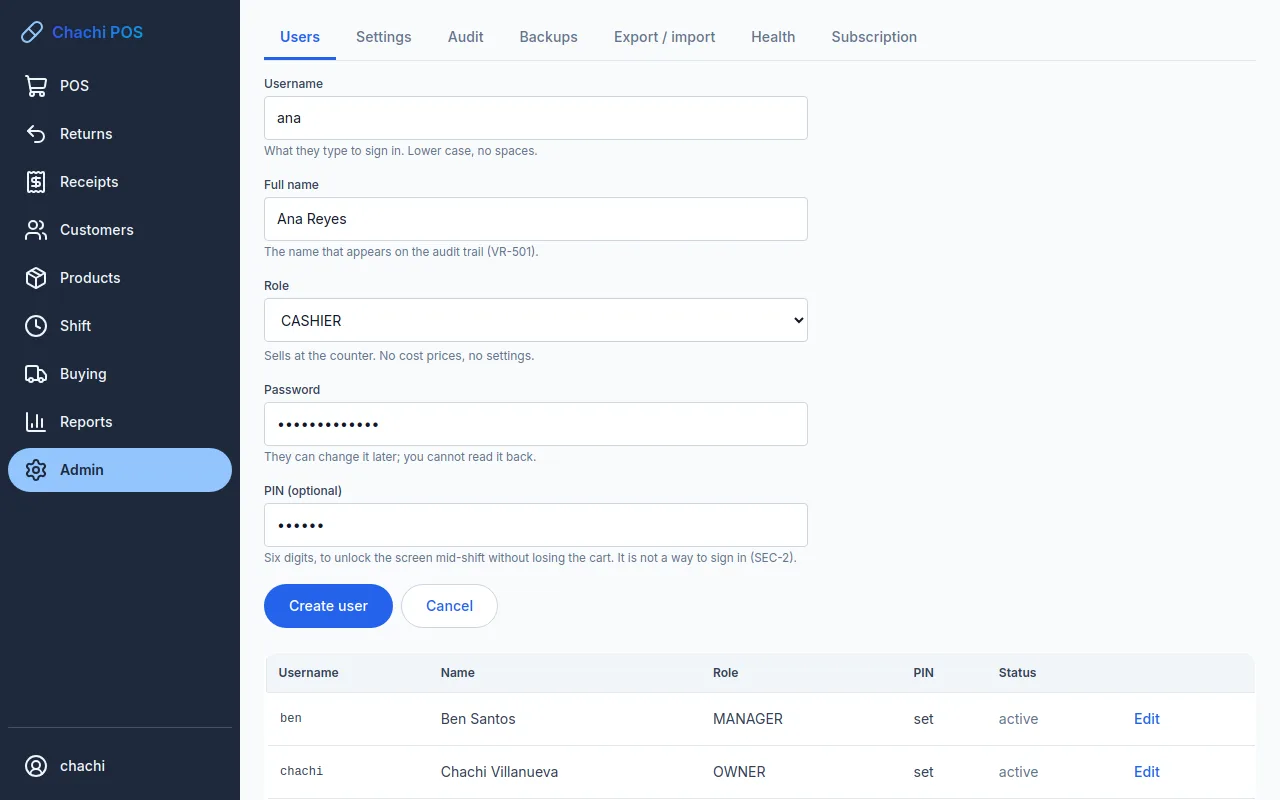
- Open Admin → Users and press New user.
- Type the Username they will sign in with: lower case, no spaces, 3 to 32 characters, and different from everyone else's.
- Type the Full name. This is the name shown on the audit trail.
- Choose the Role. A note under it says what the role does (see Roles: who can do what).
- Type a Password of at least 10 characters, and tell the person what it is.
- Type a 6-digit PIN. It is optional, but without one a cashier must type their full password whenever the screen locks. A PIN cannot be all one digit (111111) or a run such as 123456.
- Press Create user. They appear in the list, and the PIN column shows "set" if they have one.
Change a user's name or role
Who: Owner
- In Admin → Users, press Edit on the person's row.
- Change the Username, Full name or Role. Leave New password and PIN blank to keep them.
- Press Save.
The store must always keep one active owner. Changing the last owner to another role is refused with This is the last active owner. Create another owner before demoting this one.
Reset a password or PIN
Who: Owner
Everyone can change their own password and PIN from their username at the bottom of the menu (Change your own password or PIN). When someone forgets theirs, or is locked out after too many wrong tries, the owner sets a new one here.
- In Admin → Users, press Edit on the person's row. A locked account shows locked … min under Status.
- Type a New password (at least 10 characters), a new 6-digit PIN, or both.
- Press Save. A new password also unlocks the account at once.
Nobody can read a password or PIN back. The audit trail records that it was reset, never what it is. If the owner's own password is lost, see Troubleshooting.
Deactivate or reactivate a user
Who: Owner
Users are never deleted. When someone leaves, deactivate them: they can no longer sign in, and everything they did still shows their name.
- In Admin → Users, press Edit on their row, then Deactivate, and confirm. They disappear from the list.
- To bring someone back, tick Show deactivated, press Edit on their row, then Reactivate.
The last active owner cannot be deactivated. Create another owner first.
Change a setting
Who: Owner; Manager for the settings not marked owner only
Admin → Settings holds every figure the store runs on, in sections: The store (with Tax mode), Security and sessions, Sales and the till, Reports and alerts, Discounts and rounding, Inventory, Credit, Purchasing and Backup.
- Find the setting. A small grey line under it gives its internal name, the values allowed, the default, and when it was last changed.
- Change the value. For a list, such as reasons, type one item per line.
- Press Save this section at the bottom of that section. Each section saves on its own.
- The message says how many settings were saved. If a value is not allowed, the message says why, and nothing in that section is saved.
Every change goes on the audit trail with the old and the new value.
Tip: money amounts are in centavos (the internal name ends in "_centavos"): type 10000 for ₱100.00. Percentages are in basis points (the name ends in "_bp"): 100 is 1%, so 2% is 200.
Change the store's details and the receipt heading
Who: Owner or Manager
The top of every receipt prints the store name, address, contact number and TIN (when set). The bottom always says This is not an official receipt. That line is required for these receipts and cannot be changed. Chachi POS does not print BIR official receipts, and there is no other custom header or footer.
- In Admin → Settings, go to The store.
- Change the Store name, Address, Contact number or TIN.
- Press Save the store. The next receipt prints the new details.
Change the tax mode
Who: Owner only
The tax mode decides what the receipt prints and what every report header states. Change it only when the store's registration really changes, and ask your accountant first.
- In Admin → Settings, under The store, find Tax mode. It says the current mode.
- Choose NONE — Not registered, NON_VAT — Non-VAT (percentage tax) or VAT — VAT-registered. A sentence under it explains the choice.
- Optionally type why it is changing in the box next to it. It is kept on the audit trail.
- Press Change mode and confirm.
Important: past sales keep the mode they were made under, and any report covering the day of the change shows both modes. This cannot be undone.
Set up the receipt printer and print a test page
Who: Owner or Manager, usually with Chachi's on installation day
The printer settings are in the Sales and the till section of Admin → Settings. Until a printer is set up, nothing prints, but every sale still saves normally.
- Set Receipt width: 32 columns for 58 mm paper, 48 for 80 mm to match your paper roll.
- Set How the receipt printer is connected: NONE, USB, LAN, or BROWSER (the print dialog). The web version is set to BROWSER for you.
- For a USB printer on Windows, type the printer's shared name on this PC in USB printer device or share the bridge writes to, in the form \\COMPUTER-NAME\PRINTER-NAME, for example \\SHOPPC\POS-58. The printer must be shared in Windows. Chachi's sets this up when installing.
- For BROWSER, install the receipt printer on the computer or tablet with its own driver, as you would for any printer. Each receipt then opens the browser's print box with the receipt on it: choose the receipt printer, and the first time set Margins to None and untick Headers and footers. The browser remembers them. The receipt screen says Receipt sent to this device's print dialog.
- For a LAN (network) printer, type its address, such as 192.168.1.50, in LAN printer address. Leave LAN printer port at 9100 unless the printer's manual says otherwise.
- Press Save this section. The test uses the saved settings, so save first.
- Press Print a test page. A slip headed PRINTER TEST should come out.
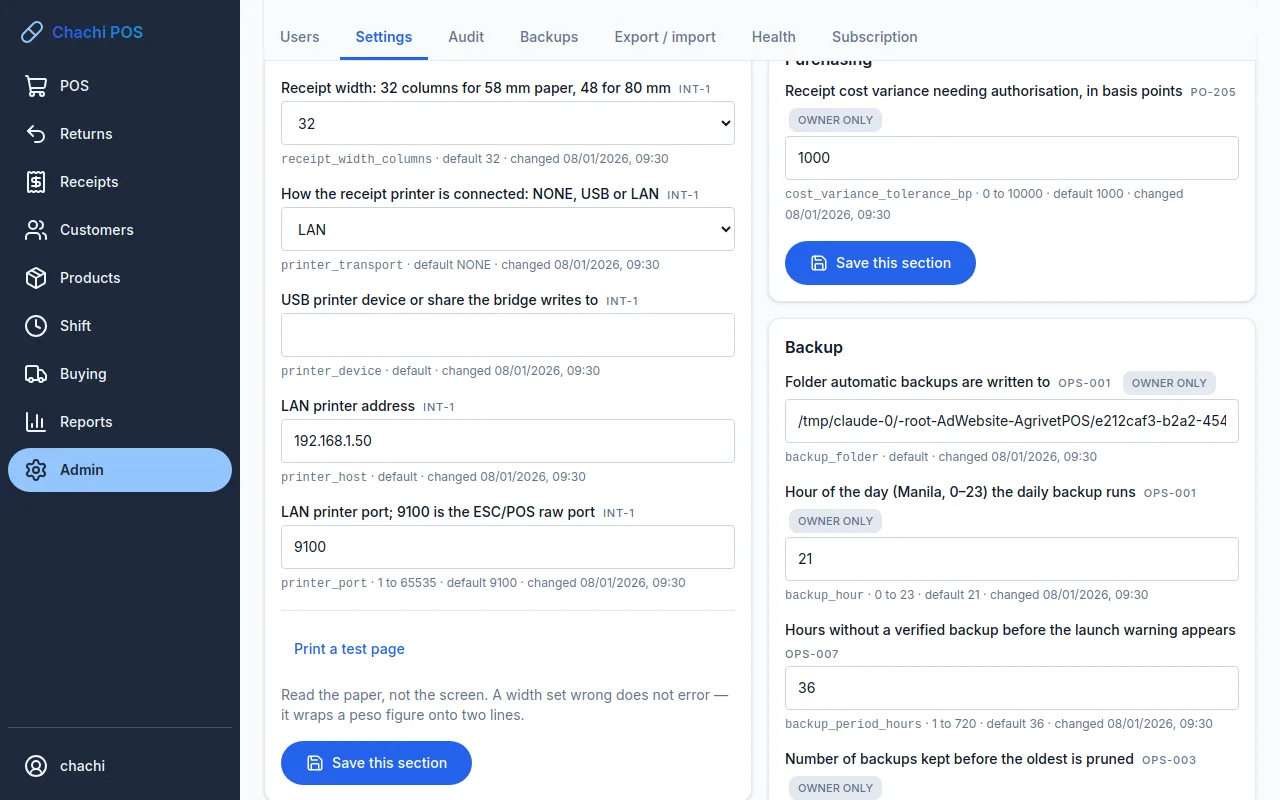
Check the paper, not the screen. A wrong width gives no error; it wraps peso amounts onto two lines. On a network printer, the success message can appear before the printer has answered.
If the message says It did not print (…). It is queued., the words in brackets say why. For example, "No receipt printer is configured." means the connection is still NONE. A receipt that failed to print can be reprinted later; the sale itself is never lost.
On Android: set the connection to LAN and use a network (Wi-Fi or LAN) ESC/POS printer. USB and Bluetooth printers are not supported.
Connect the cash drawer
Who: Owner or Manager, usually with Chachi's
There is no drawer setting. The drawer's cable plugs into the drawer port on the receipt printer, not into the computer, and the printer opens it. It opens for a cash sale, a cash payment on a customer's account, a cash refund, cash handed back on a void, and cash in or out of the till.
- Plug the drawer cable into the printer's drawer port.
- Set up the printer (above).
- Test with a real ₱1 cash sale, then void it (see Returns, voids and reprints).
If the drawer does not open, the sale is still saved. Open it with its key and check the cable at the printer.
A café's kitchen printer, service charge and orders
Who: Owner. The kitchen printer can also be set by a Manager.
A store set up as Café / Restaurant starts taking orders before they are paid, with kitchen tickets printing on the receipt printer and no service charge. Each can be changed in Admin → Settings.
- Take orders before they are paid, with a table or a name, and send them to the kitchen (in Sales and the till): on for a café. Off, the counter works like a shop's, with Park and Retrieve.
- Kitchen tickets print on (in Sales and the till): RECEIPT uses the receipt printer, including the web version's print dialog, where the ticket prints on its own page after the receipt. LAN is a network printer in the kitchen: type its address in Kitchen printer address on the network. NONE prints no tickets. Like the receipt printer, this is set on each device.
- Service charge on a dine-in bill, in basis points; 0 is none (in Discounts and rounding): 1000 is 10%. It is added to dine-in bills only, after every discount, and prints on the receipt as its own line. It appears on the daily report as + service charge. A return does not refund it: if a table's whole bill was wrong, void the sale during the shift instead.
Set discount limits and cash rounding
Who: Owner only
These are in Discounts and rounding in Admin → Settings. Each role can give a discount up to its own limit. Above that, a manager or owner whose limit covers it approves at the counter (see Selling at the counter).
| Setting | Default | Meaning |
|---|---|---|
| Highest discount a cashier may apply, in basis points | 200 | 2% |
| Highest discount a manager may apply, in basis points | 500 | 5% |
| Highest discount an owner may apply, in basis points | 10000 | 100% |
| Cash payable rounding step in centavos; 1 is off | 1 | No rounding. Type 25, for example, to round the cash due to 25 centavos. |
| Basket-size discount bands, on the subtotal before any discount | One band at 0% | No basket discount. |
Basket-size bands are typed as a list. Each band has the subtotal it starts at in centavos, the discount in basis points, and a label. For 2% off baskets of ₱1,000 or more:
[{"min_subtotal_centavos": 0, "discount_bp": 0, "label": "No basket discount"}, {"min_subtotal_centavos": 100000, "discount_bp": 200, "label": "2% over ₱1,000"}]
Two bands cannot start at the same amount. If the list is not typed correctly, it is refused and nothing is saved.
Senior citizen and PWD discount
Who: Owner only
The statutory 20% senior citizen and PWD discount (and, for a VAT-registered store, the VAT exemption) is built in and is on from the start. The 20% rate is set by law and cannot be changed.
- The switch is Grant the senior citizen and PWD statutory discount on eligible products, in Discounts and rounding. Leave it ticked.
- Which products qualify is set on each product, with the senior citizen / PWD tick in the product editor (see Products and prices).
- The cashier gives it at the counter with F8 SC/PWD (see Selling at the counter).
Agrivet store: this switch starts off. Turn it on only if you sell eligible goods for the customer's own use.
All the other settings
Who: Owner; Manager for the settings not marked owner only
Labels as they appear on the screen. Leave a setting at its default unless you have a reason to change it.
| Section | Setting | Default |
|---|---|---|
| Security and sessions | Minutes of inactivity before the screen locks | 15 |
| Security and sessions | Failed sign-in attempts before an account locks | 5 |
| Security and sessions | Minutes an account stays locked | 15 |
| Sales and the till | Cash variance at shift close that requires a reason | 10000 (₱100) |
| Sales and the till | Settlement variance that requires a reason | 10000 (₱100) |
| Sales and the till | Reasons till cash may be moved in or out | Owner withdrawal, Petty cash, and others |
| Sales and the till | Hours a shift may stay open before it raises an alert | 24 |
| Sales and the till | Days a return is accepted without manager authorisation | 7 |
| Sales and the till | Reasons a customer may return goods | Wrong item sold, Expired stock, and others |
| Sales and the till | Categories whose returns default to write-off rather than restock | Medicines, OTC Medicines, Vitamins, and others |
| Reports and alerts | Days a cash-variance alert keeps showing on the dashboard | 7 |
| Reports and alerts | Days a dismissed alert stays hidden before it is raised again | 1 |
| Reports and alerts | Longest range a single report may cover | 366 days |
| Inventory | Allow a sale to take stock below zero, flagged and warned | Off |
| Inventory | Adjustment value above which owner authorisation is required | 500000 (₱5,000) |
| Inventory | Reasons an inventory adjustment may be filed under | Damaged in storage, Spoilage, and others |
| Inventory | Days before an unposted stock count is flagged stale | 7 |
| Inventory | Days before expiry at which a batch reads NEAR_EXPIRY | 90 |
| Credit | Days before a due date at which a balance reads DUE_SOON | 3 |
| Purchasing | Receipt cost variance needing authorisation, in basis points | 1000 (10%) |
| Backup | Folder automatic backups are written to | The folder chosen in setup |
| Backup | Hour of the day (Manila, 0–23) the daily backup runs | 21 (9:00 pm) |
| Backup | Hours without a verified backup before the launch warning appears | 36 |
| Backup | Number of backups kept before the oldest is pruned | 30 |
A sale may be voided only within its own open shift is shown for information and cannot be changed.
How automatic backups work
Who: automatic; the owner or a manager checks them
Chachi POS backs itself up every time a shift is closed, and once a day after the configured hour (9:00 pm unless changed) while the app is running. It also takes a backup just before a restore, an import, an opening-data load or an update.
Each backup is a .zip file named pharmacy_backup_ plus the date, time and cause, in the folder shown on Admin → Backups. The app opens and checks each one straight away. Only one that passes shows Verified, and only verified backups count. The newest 30 are kept.
If no backup has been verified for 36 hours, a red warning appears on the dashboard and the Backups tab. It cannot be dismissed. It usually means the backup folder's drive is unplugged or missing.
Tip: to move backups elsewhere, change Folder automatic backups are written to in Settings. It must be a full path outside the app's own data folder. Old backups stay in the old folder; copy them across if you want them listed.
Make a backup now
Who: Owner or Manager
- Open Admin → Backups.
- Press Back up now. The message says Backing up and verifying…, then the file name and verified.
- The new backup is at the top of the list, with the trigger "manual".
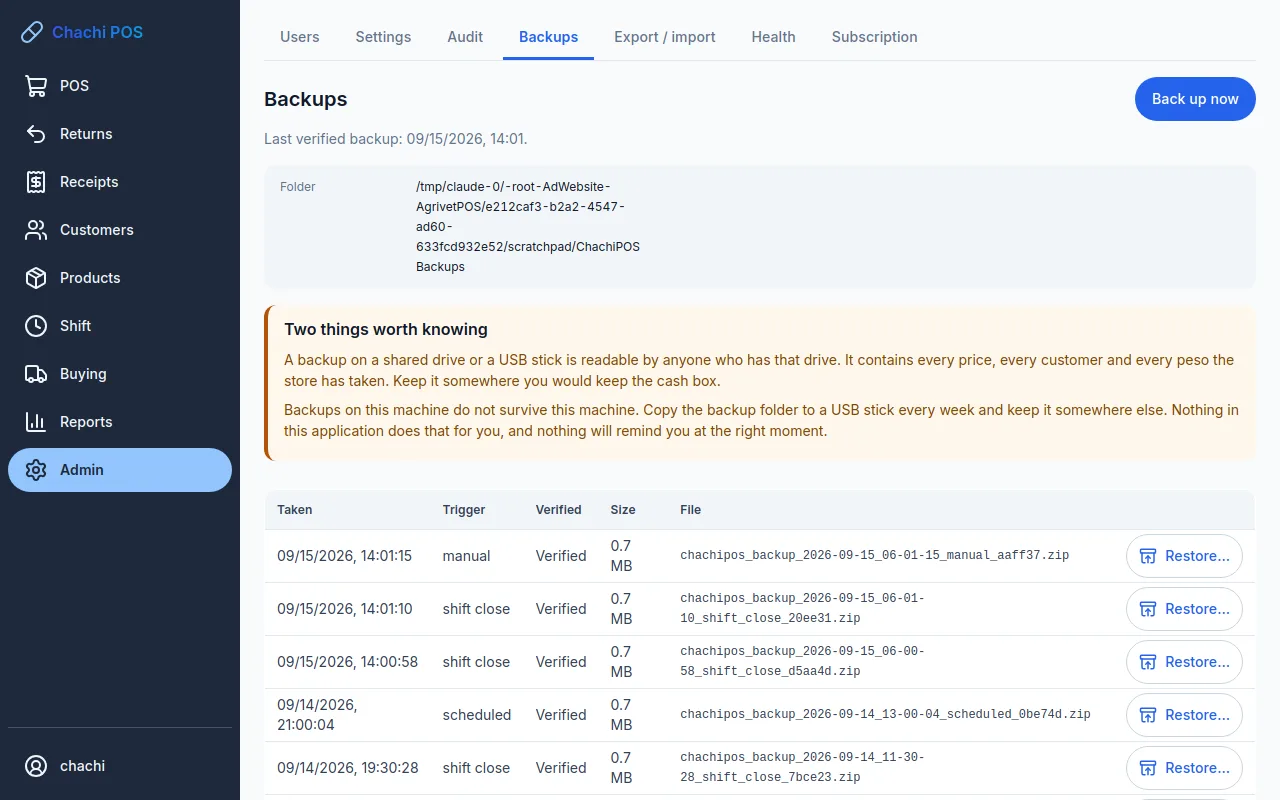
If it fails, the message says why, for example that the folder cannot be written to. Check that the drive is plugged in, or choose another folder in Settings.
Download a copy
The owner sees Download beside Restore… on each verified backup. It saves the backup file to the computer's Downloads, from where you can copy it to a USB stick or a cloud folder. The download is recorded in the audit trail, because the file holds every price, customer and peso.
On the web version this is your own copy of the store's data: download the newest backup every week. It is also the file you would restore on a PC if you ever move the store off the web (Moving to a new computer).
Copy backups off the computer
Who: Owner or Manager, once a week
Backups on the shop computer do not survive losing that computer to fire, theft, flood or a failed disk. The app cannot copy them elsewhere for you, and will not remind you.
- Plug in a USB stick.
- Open the backup folder shown on Admin → Backups in File Explorer.
- Copy the folder, or at least the newest files, to the stick, and keep the stick away from the shop computer.
Important: backups are not password-protected. Anyone with the file can read every price, customer and peso the store has taken. Keep the stick where you keep the cash box.
On Android: connect the tablet to a computer with a USB cable and copy the Documents/ChachiPharmacyPOS Backups folder.
Restore a backup
Who: Owner only
Restoring replaces everything with the contents of a backup. Every sale, payment, stock movement and customer change made after it was taken is gone. Use it only when the data is damaged or something cannot be corrected any other way. Fix a wrong price by changing the price, and a wrong sale with a void or a return.
- Close every open shift, including other people's. A restore is refused while any shift is open.
- Open Admin → Backups and find the backup. Read its date under Taken.
- Press Restore… on that row. The box Restore this backup? says what will be lost.
- Type the file name exactly as shown under the box. Restore only works when it matches.
- Press Restore. The app first backs up the current data; if that fails, nothing is changed.
- The message names that fresh backup. Anything you need from the period you undid is in it.
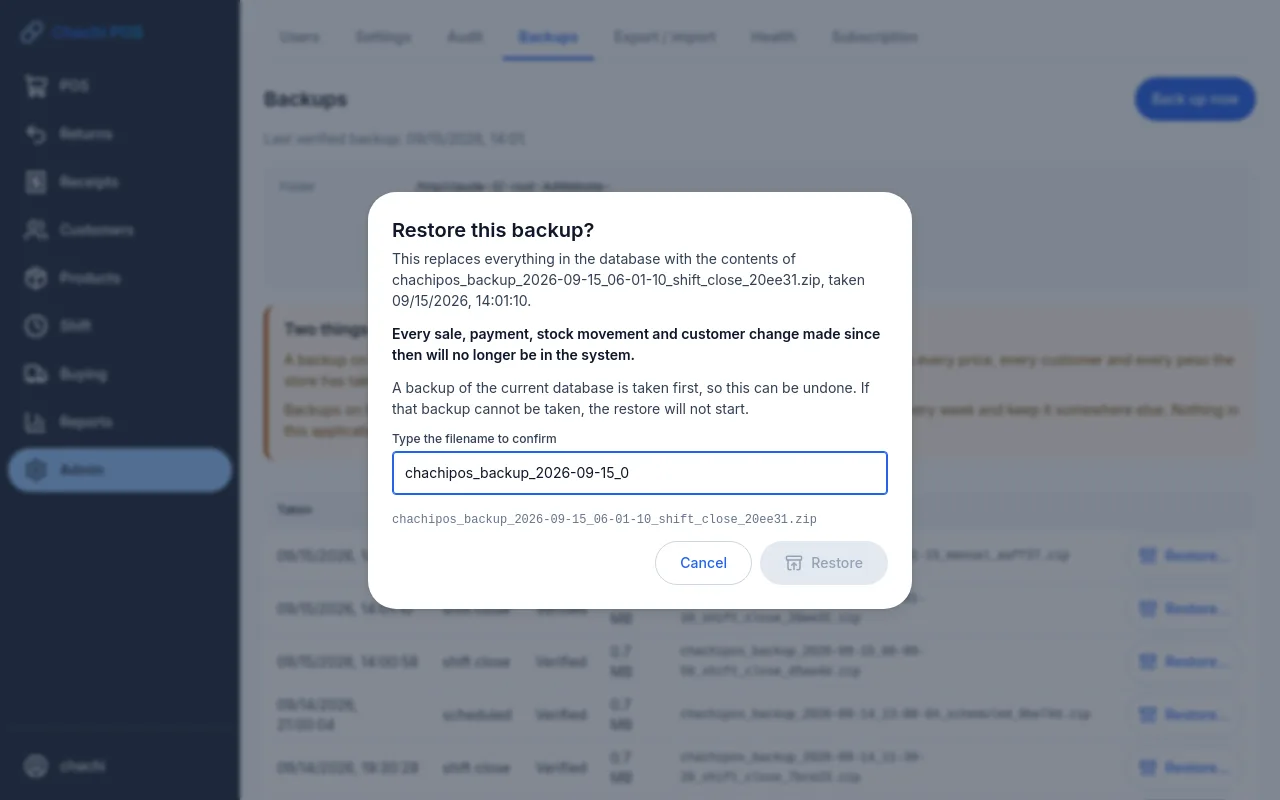
If your user did not exist yet in that backup, the app restarts and you sign in as a user that did.
Restore… appears only on verified backups still in the backup folder. Rows marked pruned or not in folder cannot be restored.
A backup from another computer
Backup files in the folder that are not in the list appear below it, under Other backups in the folder. They were copied there from another computer, or made here before the last restore. To use a backup on a USB stick or elsewhere on this device, click Restore from a file… at the top of the tab and choose it. The app checks it and saves a copy into the backup folder.
Press Restore… on the file. The box opens it first and shows the Store it holds, when it Last recorded anything, and the Owner sign-in. Read them, then type the file name and press Restore as above. A file that is not a backup, or one made by a newer version of Chachi POS, cannot be restored, and the box says why. After restoring another store's backup, sign in with a username from that backup.
A restore never changes the backup folder: this computer keeps backing up to the folder it was using. To move the store to a new computer, see Moving to a new computer.
Export all the store's data
Who: Owner or Manager
An export is one .zip archive holding every record as readable files, for keeping a copy other programs can read or for moving the data into another Chachi POS. It is not a backup; to put the store back as it was, restore a backup.
- Open Admin → Export / import.
- Press Export everything and save the file.
Important: passwords and PINs are never exported. After importing into a new installation, the owner must set a new password for each person before they can sign in.
On Android: the export is saved to Downloads.
Import an exported archive
Who: Owner only
An import writes the data from an exported archive into this store. A full backup is taken first, and the import lands completely or not at all.
- In Admin → Export / import, under Import, choose If a row is already here: Keep what is here, skip the archive's, Replace it with the archive's, or Do not import at all. It applies to the whole import.
- Under Archive, choose the .zip file. The app checks it and writes nothing.
- Read the summary. Ready to import shows the source store, row counts and collisions. This archive cannot be imported lists the problems.
- Press Import this archive. It only works when the check has passed.
- Imported shows the rows written, skipped and replaced, and the backup taken first. Press Done.
If the import was a mistake, restore that backup from the Backups tab. The same tab also has Load opening data, for the Excel template (see Products and prices).
Read the audit trail
Who: Owner or Manager
The audit trail answers "who changed this, and what was it before?" It records price and cost changes, credit limits, stock adjustments, voids, returns, reprints, user and settings changes, exports and restores, shift opens and closes, cash in and out, and approvals. Nothing on it can be changed or removed.
- Open Admin → Audit. The newest rows are first, 50 to a page. Use Newer and Older to move between pages.
- Each row shows When, Who, What happened, what it was On, and Why.
- Click a row marked + to see Before and After: the old and new values side by side.
- To narrow the list, use Who, What, From and To, which apply at once. For Entity (products, sales, users…), type it and press Filter. Clear shows everything again.
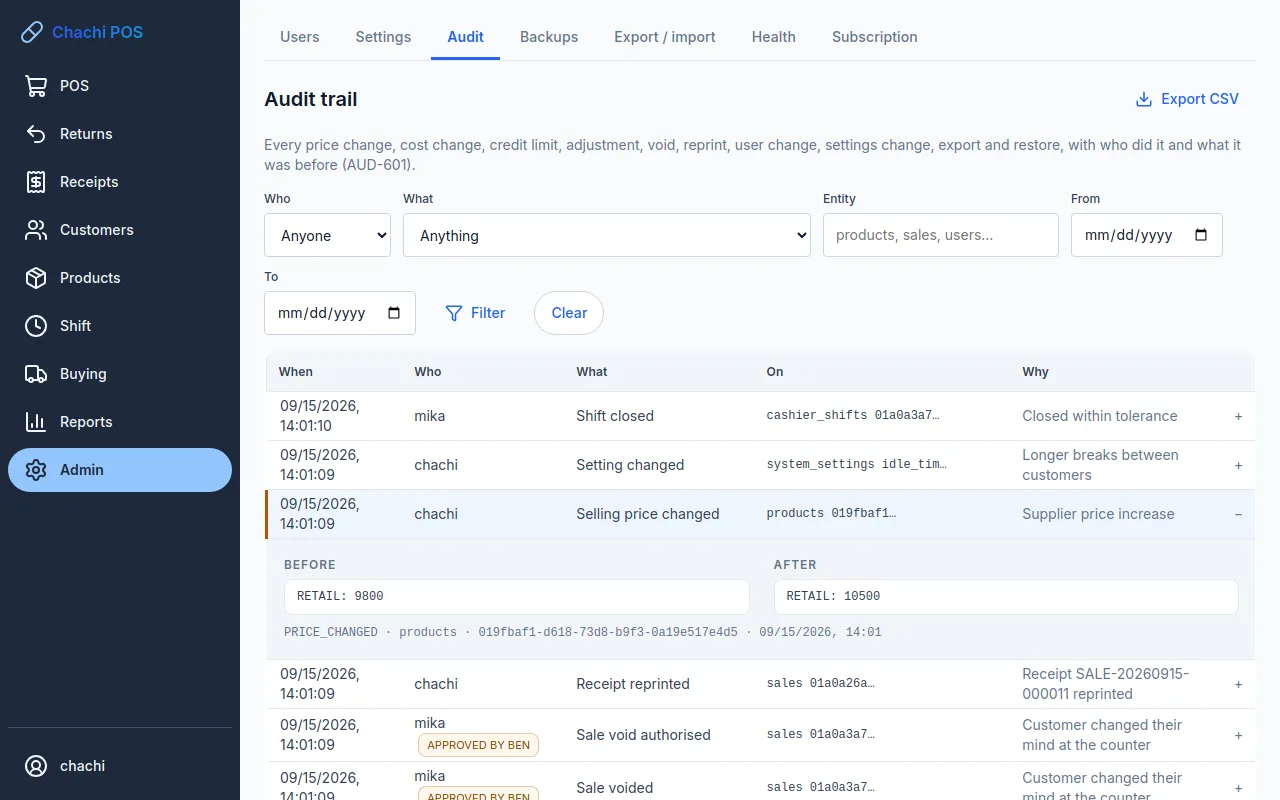
An approved by tag beside a name means someone else authorised the action, such as a manager approving a void. system means the app did it by itself, such as a scheduled backup. Permission refused rows show someone trying to reach something their role does not allow.
Export CSV saves the rows matching your filters as a spreadsheet file. The export itself goes on the trail.
Check the health panel
Who: Owner or Manager
Admin → Health tells you whether this installation is safe to trade on. Open it first when something seems wrong.
| Line | What it tells you |
|---|---|
| Schema version | The database layout's version. If it adds "this build expects…", restart the app. |
| Database size | How big the store's data is. |
| Last verified backup | When the last good backup was taken, and its file. "Never" needs action today. |
| Backup folder | Where backups go. "Not set" means none are running. |
| Last export | When the data was last exported. |
| Last integrity check | When the database was last checked, and whether it was sound. |
| Application version | The version of Chachi POS on this device. |
Press Check the database now to test the database. It says The database is sound. or lists the problems; if there are problems, call Chachi's before restoring anything. Red lines at the top warn about an old backup, a computer clock that is behind (fix the clock; selling still works), or a needed restart. The Rows and Storage settings lists are for Chachi's support.
Tip: when you call Chachi's, read out the Application version and Last verified backup.
Web & devices
Who: Owner
Admin → Web & devices shows one of three things, depending on where you open it:
- On the store's web copy: every connected phone and PC, with its letter, when it last synced and whether it is behind. Rename changes its name; Remove stops it syncing at once (for a lost or sold phone). What a removed device sold before it last synced stays; what it sold after stays on that device only. The tab also says how to connect another device.
- On a connected phone or PC: the store's web address, this device's name and letter, when it last synced, how many changes are waiting to go, and the last problem if there was one. Sync now tries straight away; otherwise it syncs every few seconds by itself. The word under the menu shows the same: Synced, or Offline · 3 waiting.
- On a store that is on one device only: the form to put it on the web (Use the web and phones or PCs together).
If a device says This device is on an older version of Chachi POS than the store's web copy, update the app. It keeps selling meanwhile, and sends everything once it is updated.
The subscription screen and its warnings
Who: Owner links it; a Manager can see its state
Admin → Subscription shows whether this POS is covered. Linking it the first time is in Link your subscription and start the free trial. Once linked, it shows the store, Owner (the Google account), Paid until, Last checked and Check again by.
The POS checks by itself whenever it has the internet. Press Check now to check at once, for example after Chachi's has recorded your payment. Link again repeats the link with a new code; you rarely need it.
| Tag | What it means | What to do |
|---|---|---|
| Active | Subscribed until the date shown. | Nothing. |
| Ending soon | The last 7 days. The message says why: the paid period is ending, or this POS has not reached the internet since the date shown. | Pay through Chachi's, or connect to the internet and press Check now. |
| Grace period | The subscription has ended; everything still works for 7 more days. | Renew now. After the grace date, no new shift can be opened. |
| Lapsed | No new shift can be opened, so nothing new can be sold. Reports, export and backups still work. | Renew, then press Check now. |
| Not linked | Never linked, or the licence is not valid for this POS. | Press Link this POS and approve the code. |
| Not set up | This copy of the app cannot check licences. | Call Chachi's. |
The subscription ends on the paid-until date, or 30 days after the last successful check, whichever is sooner. So a paid POS that stays offline for a month also warns you. The same message appears on the Reports dashboard.
A lapse never loses data and never stops a shift that is already open; that shift can finish and close normally. Setting the computer's clock back does not undo a lapse. If Check now says The licence server could not be reached, check the internet connection and try again.