
Customers and utang
Keep a list of the customers who buy on credit, set how much credit each one gets and when they must pay, collect their payments, and print a statement they can check line by line. This chapter also covers store credit and writing off a debt that will never be paid.
Add a customer
Who: Cashier, Manager or Owner
A walk-in sale needs no customer. Add the people who buy on credit, and anyone who should get a different price list.
- Click Customers in the menu.
- Click New customer. A form opens above the list.
- Type the Name (2 to 120 characters).
- If you like, type a short Code — what the store calls them in the notebook, for example RDC-01. Each code can be used once.
- Type the Contact number: a mobile such as 0917 123 4567, or a landline with its area code.
- Choose the Type and the Price level (see the next section).
- If they will buy on credit, tick Buys on credit, then type the Credit limit (₱) — the most they may owe at one time — and the Terms (days) they have to pay. 0 means cash on delivery.
- Click Add customer. You see "(name) added." and their profile opens.
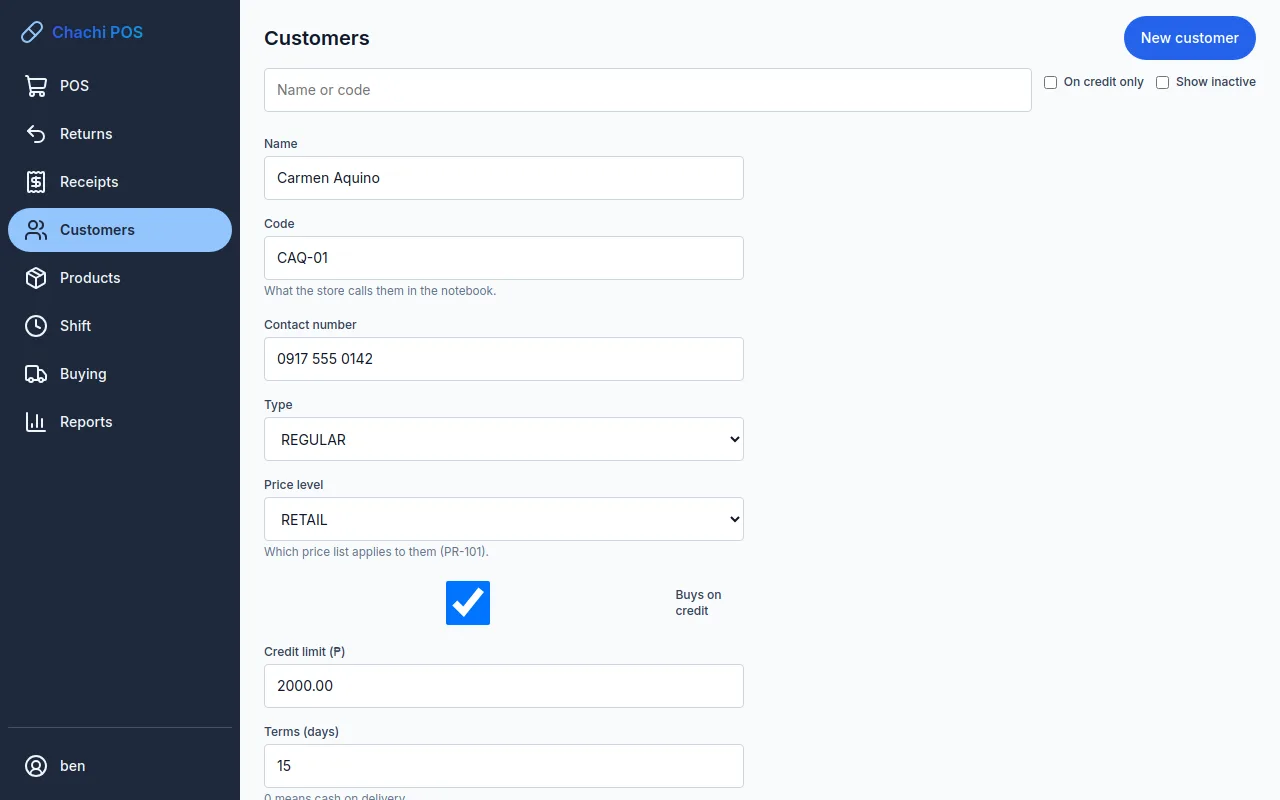
Important: Decide about credit when you add the customer. In this version the profile has no switch to turn credit on later for a customer added as cash-only.
If a number is refused, Chachi POS says it does not look like a Philippine mobile or landline. Spaces and dashes are fine. To bring in the balances from your old notebook when you start, use the setup spreadsheet — see Getting started. Those balances appear on the statement as "Opening balance".
Customer types and price levels
Who: Anyone adding a customer
The Type is a label for your own sorting. It does not change prices. The Price level does: it decides which of each product's prices the customer pays (RETAIL, WHOLESALE or DEALER). The prices themselves are set on each product — see Products and prices.
| Type | Use it for |
|---|---|
| WALK IN | An unnamed counter customer. A walk-in can never buy on credit. |
| RETAIL | An ordinary shopper. |
| REGULAR | A known customer who comes back — the usual choice, and the one the form starts with. |
| WHOLESALE | A buyer in quantity, such as a clinic or a barangay health station. |
| DEALER | A reseller. |
| FARM | For the farms an agrivet store sells to. A drugstore can ignore it. |
Agrivet store: customers created from the opening-balance spreadsheet are given the type FARM. In a pharmacy they are REGULAR.
Change a credit limit or terms
Who: Manager or Owner
- Click Customers and click the customer's row to open their profile.
- Click Change credit limit.
- Type the new Limit (₱) and, if needed, the new Terms (days).
- Type why it is changing in the box beside the button.
- Click Save limit. You see "Credit limit changed."
A cashier who tries this is refused. Every change is kept in the audit trail with the old and new figures and who made it. New terms apply to new sales only: what the customer already owes keeps the due date it was given on the day of the sale.
Change or deactivate a customer
Who: Cashier, Manager or Owner (limit and terms: Manager or Owner)
- Open the customer's profile and click Edit details under their details.
- Change the Name, Code, Contact number, Address, Type, Price level or Notes.
- Click Save. You see Saved., and the change is on the audit trail.
To let a customer buy on credit, tick Buys on credit and fill in the Credit limit and Terms (days). A walk-in customer cannot buy on credit. Untick it to stop credit; that is refused while the customer owes anything. The limit of a customer already on credit is changed with Change credit limit (above).
Deactivate a customer
- Open the customer's profile.
- Click Deactivate and confirm.
A deactivated customer stays on every past sale and payment, but can no longer be chosen at the counter. Reactivate on their profile brings them back. Tick Show inactive on the list to see them. A customer who owes money, or who has store credit, cannot be deactivated: "This customer still owes ₱… Collect or write off the balance before you deactivate them." A customer is never deleted.
Sell on credit
Who: Cashier, Manager or Owner, on their own open shift
- On the POS, press F2 (Customer) and search by name, code or number. Click the customer.
- Ring up the items and press F9 to pay.
- The payment screen shows the customer's Limit, Balance and Available credit. Click CREDIT for the amount going on their account.
- Complete the sale as usual.
The sale is due on the date their terms give (for example 15 days after the sale); with terms of 0 it is due the same day. Only a registered, active customer who buys on credit can use CREDIT. The full steps are in Selling at the counter.
When a customer is over their limit
Who: Cashier; a Manager or Owner decides
When you choose a customer who has no credit left, the POS says "(name) is at their credit limit." On the payment screen, a sale bigger than their available credit shows "This sale is more than their available credit. Put up to ₱… on CREDIT, or a manager or owner approves the rest when you press Complete."
- Put the amount on CREDIT and press Complete. A box headed CR-104 — authorisation required opens under the payments. It says how much credit the customer has left and how far over their limit this sale takes them.
- The manager or owner types their own username in Approver, their own password in Password, and in Reason why the customer may go over (for example Pays every Friday; owner agreed).
- They click Approve. The sale completes and the receipt prints. The audit trail records the cashier, the approver and the reason.
The approver must be a manager or owner, and not the person selling. A cashier's name is refused in the box: … is a cashier and cannot approve this. A manager or owner must. A manager's approval for a discount on the same sale does not cover going over the limit, so the box asks again. Cancel closes the box and keeps the sale on the screen.
Instead of an approval you can put only the available amount on CREDIT and take the rest in cash, GCash or QR Ph, or a manager or owner can raise the limit (Change a credit limit).
The dashboard lists how many accounts have reached their limit.
Take a payment on account
Who: Cashier, Manager or Owner, on their own open shift
Use this when a customer pays some or all of what they owe. A payment is always applied to their oldest unpaid invoice first, then the next oldest.
- Click Customers, then Take payment on the customer's row (or open their profile and click Take payment).
- The screen shows what they Owe now. Type what they are paying in Amount (₱), or click Pay in full.
- Choose the Method: CASH, GCASH or QRPH.
- For GCash or QR Ph, type the Reference number from the customer's phone. It is required. Chachi POS records it; it does not check that the money arrived, so check your wallet.
- Add Notes if useful.
- Check the line under the form, for example "₱1,500.00 owing − ₱500.00 paid = ₱1,000.00 owing".
- Click Record payment. For cash, the drawer opens.
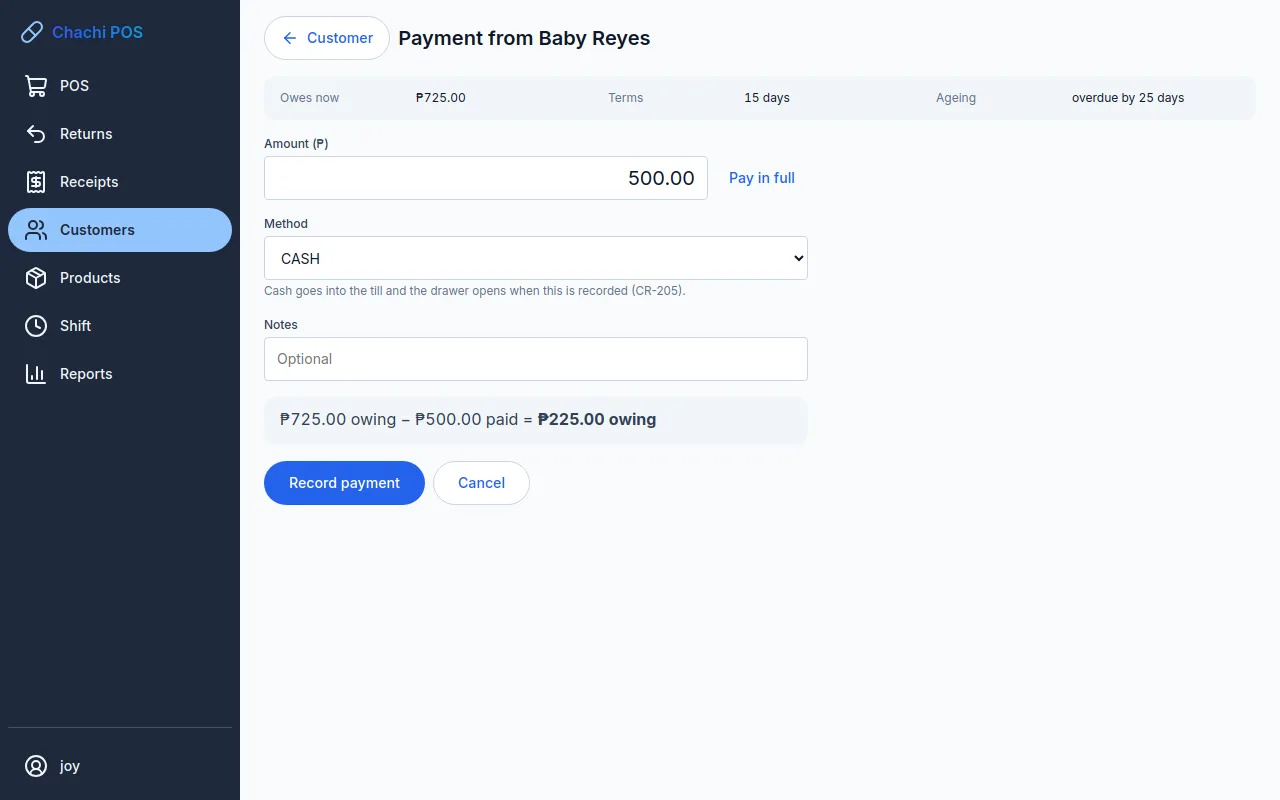
You then see Payment recorded, with "They still owe ₱…" or "They owe nothing now.", and What it settled — which invoices the money went to. A COLLECTION ACKNOWLEDGEMENT prints with its own number (COLL-…), the amount, method, reference, the invoices it paid, the balance now and your name. Hand it to the customer. It is not an official receipt. Click Done to return to the profile.
- Part payments are normal. Each payment is recorded separately, even two on the same day.
- No open shift: you are told to open your shift first — see Open your shift. A cash payment goes into your drawer and is counted at your close as "Collections in cash".
- Paying more than they owe: the screen says "That is ₱… more than they owe." Record payment stays greyed until you tick Yes — keep the extra ₱… as store credit against their next purchase. Or lower the amount and give change.
Print a statement
Who: Manager or Owner
A statement is what you hand a customer who asks "how much do I owe?". It starts from the balance brought forward, lists every sale, payment, return and write-off in the period with a running balance, and ends with the balance on the last day.
- Open the customer's profile and click Statement.
- The period starts on the first of this month. To change it, pick the two dates and click Show.
- Check the lines. Under each payment you see which invoices it settled.
- Click Print. You see "Statement printed." (or "Statement queued for the printer." if the printer did not answer).
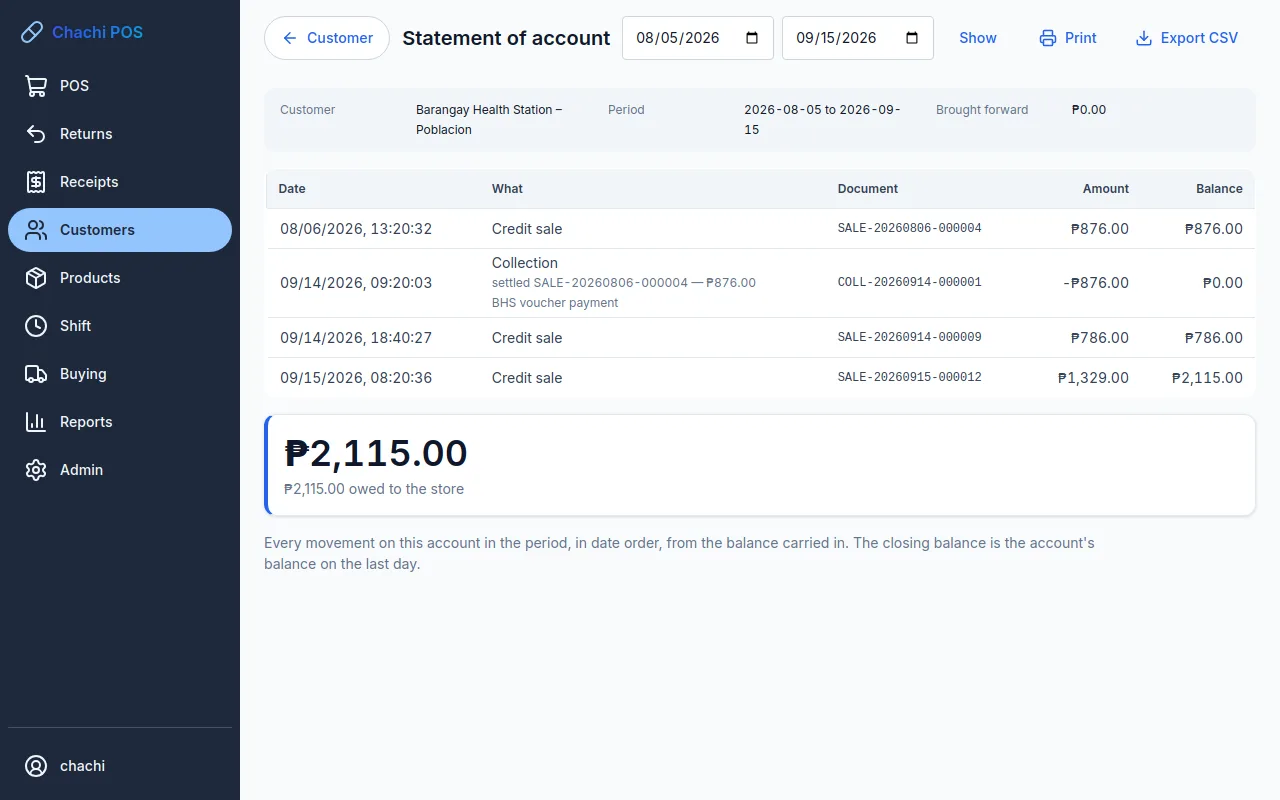
The bottom line says "₱… owed to the store", or "₱… in credit — the store owes this to (name)". Export CSV saves the same figures as a spreadsheet file. A cashier who clicks Statement is told to ask the owner or a manager.
See who owes what, and for how long
Who: Manager or Owner
- Click Reports. Click the Credit outstanding or Overdue accounts tile, or Ageing in the list of reports.
- Read the totals at the top: Owed to the store and Accounts with debt, then the five columns: Not yet due, 1–30 days, 31–60 days, 61–90 days and Over 90 days past due.
- Work down the table. The customer with the oldest debt is at the top, with their phone number.
- Click a row to open that customer's profile, where you can take a payment or print their statement.
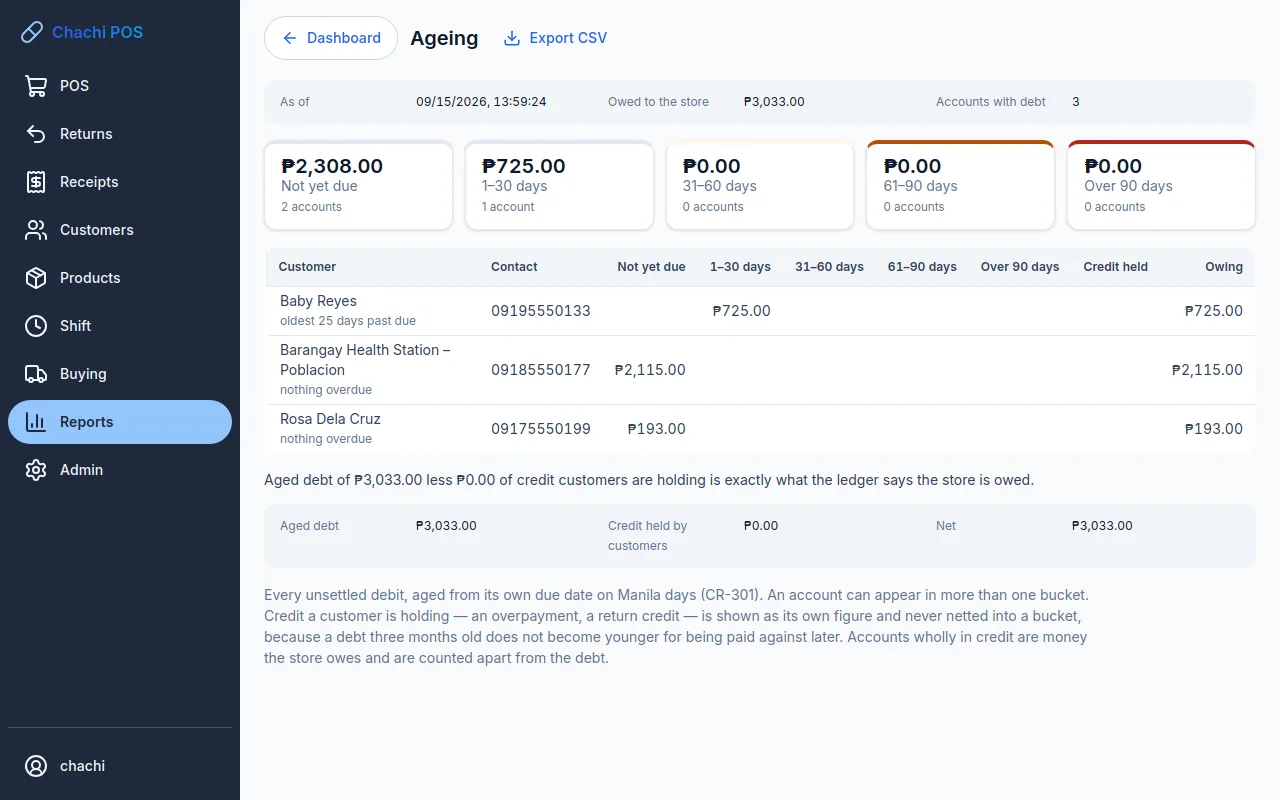
Each invoice is aged from its own due date, so one customer can have amounts in several columns. Credit held is store credit the customer has with you; it is shown on its own and never makes a debt look younger. The line at the bottom checks the arithmetic: aged debt, less credit held, equals what the accounts say is owed. Export CSV saves the report.
On the customer list, overdue … days means an invoice is past its due date and due soon means one falls due within 3 days (the owner can change this in Admin → Settings, under Credit). The dashboard also warns how many accounts are overdue.
Store credit
Who: Cashier, Manager or Owner
Store credit is money the store owes a customer. A customer gets it in two ways:
- An overpayment on account that you chose to keep as store credit (see Take a payment).
- A return of goods they bought on credit: the value goes back to their account, and anything beyond what they still owe becomes store credit. See Returns, voids and reprints.
The customer list shows in credit, and the profile says "The store owes them ₱… — from an overpayment or a return."
Spend it
- Choose the customer with F2 before paying.
- On the payment screen, click STORE CREDIT (it shows how much they hold). It covers as much of the bill as their credit allows.
- Take any rest in cash, GCash or QR Ph, and complete the sale.
You cannot spend more than they hold. Store credit can be used even when a customer is at their credit limit. It is spent on purchases; Chachi POS has no step for paying it back in cash.
Write off a bad debt
Who: Owner only
When the store accepts that a debt will never be paid — the customer moved away, or the business closed — the owner writes it off. Only the owner sees the button.
- Open the customer's profile and click Write off.
- Check Amount to write off (₱). It starts at the full balance; you can write off less.
- In Why, say what actually happened. Your accountant will read it.
- Click Write it off. You see "₱… written off. Balance now ₱…".
Important: A write-off cannot be undone. You cannot write off more than the customer owes.
Afterwards the balance falls and the oldest invoices are marked settled, so they leave the ageing report and the overdue warnings. The statement shows a "Write-off" line with your reason. A write-off is never counted as a payment received, and the audit trail records it as "Debt written off".
Agreed prices
Who: Anyone who can open a customer
The profile has an Agreed prices block. An agreed price overrides every other price for that product, whatever quantity the customer buys. Most customers have none: "None — this customer pays the retail price." This version has no screen for entering agreed prices; to give a customer a different price list, set their Price level when you add them.
When a customer disputes their balance
Who: Manager or Owner
Nothing on an account can be edited or deleted: every sale, payment, return and write-off stays on the record with the date and the person who recorded it. That is what lets you settle a disagreement.
- Open the customer's profile. Unpaid invoices shows what is still open, and Payments received shows each payment and the invoices it settled.
- Print a statement for a period that starts before the item in dispute. Go down it line by line with the customer until you find where you disagree.
- Ask for their acknowledgement slips (COLL-…) and receipts, and match the numbers against the Document column.
- For a GCash or QR Ph payment, check the reference number on the statement against your wallet's history.
- The owner can look in Admin → Audit: filter What for "Collection recorded", "Credit limit changed" or "Debt written off" to see who did it, when and why.
- The customer paid and it was not recorded: take the payment now, with a note saying when it was really paid.
- They were charged for goods they did not take: make a return on that sale, and the amount goes back to their account. See Returns, voids and reprints.
If Chachi POS ever says a statement "does not agree with the account", do not hand it over — contact us at the address below.