
Selling at the counter
Everything a cashier does in a day at the counter: open the shift, ring up items, give discounts, take any kind of payment and hand over the receipt.
Open your shift
Who: Cashier, Manager or Owner
You cannot sell until you open your own shift. The shift is yours alone: it holds your cash drawer from the start of your day until you close it. Never sell on somebody else's login.
- Sign in. A cashier lands on the POS screen; a manager or owner clicks POS in the menu on the left.
- If no shift is open, the screen says Open your shift before selling. Click Open shift. (You can also click Shift in the menu.)
- Count the cash in the drawer and type the amount in Opening float (₱). Type 0 if the drawer is empty.
- Tick I have counted this and it is correct.
- Click Open shift. You see Shift open. and the shift's cash figures.
- Click POS in the menu to start selling.
Tip: If you sign in again later in the day, your shift is still open and the app carries on with it. You do not open a second one.
Important: Type what you really counted. At closing, the cash you should have is worked out from this figure. See Cash and closing the shift for cash in and out, counting the drawer and closing.
If the store's subscription has lapsed, a new shift cannot be opened (a shift that is already open keeps working until it is closed). See Troubleshooting.
The counter screen
Who: Cashier, Manager or Owner
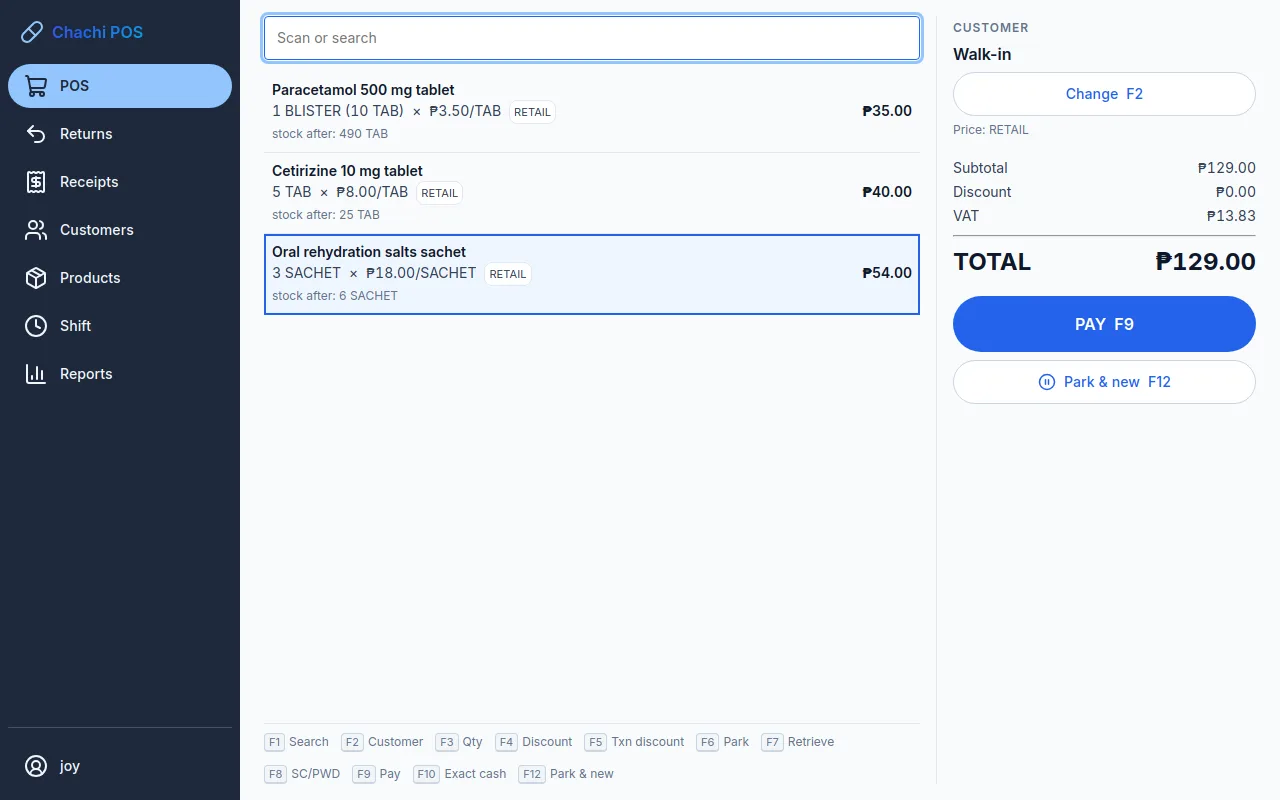
The counter screen has three parts:
- Left, at the top: the Scan or search box. When the cart is empty it says Scan an item to begin.
- Left, the cart: one line per item. Each line shows the quantity, the price per unit, the price level used (for example RETAIL), the line total, any discount, and stock after — what will be left on the shelf after this sale.
- Right: the Customer (Walk-in until you choose one) and the price level, then Subtotal, Discount, VAT (only in a VAT-registered store) and the TOTAL. Under them are PAY and Park & new.
Along the bottom is a row of buttons for the counter's actions: Qty, Discount, Txn discount, SC/PWD, Remove line, Park and Retrieve, each with its function key beside it on a computer. You can finish a whole sale with the keyboard alone, or by touch alone — see Keyboard shortcuts.
Tip: The cart is saved as you go. If the power goes off or the app is closed, the cart comes back when you open the counter again: Your cart was restored.
Add items: scan or search
Who: Cashier, Manager or Owner
Scan a barcode
- Scan the item. You do not need to click the search box first, but close any open panel (Esc) — while a panel is open, a scan types into it instead.
- The item is added as one unit (one tablet, one bottle). Scan it again to add one more — it goes on the same line.
Scan with the phone's or laptop's camera
- Tap Camera beside Scan or search. The first time, allow the camera when the phone or browser asks.
- Hold the barcode inside the box on the screen. When it is read, the phone beeps and the item is added, as if it were scanned.
- Scan the next item, and the next. Holding the same item still does not add it twice; to add one more of it, take it away and show it again.
- Tap Done when the items are in. If the light is poor, tap Light where the phone has a torch.
The camera is also on the product's Barcodes tab, where it fills in the code without selling anything, and on the product search when ordering or receiving goods. Pictures from the camera are never kept.
Search by name
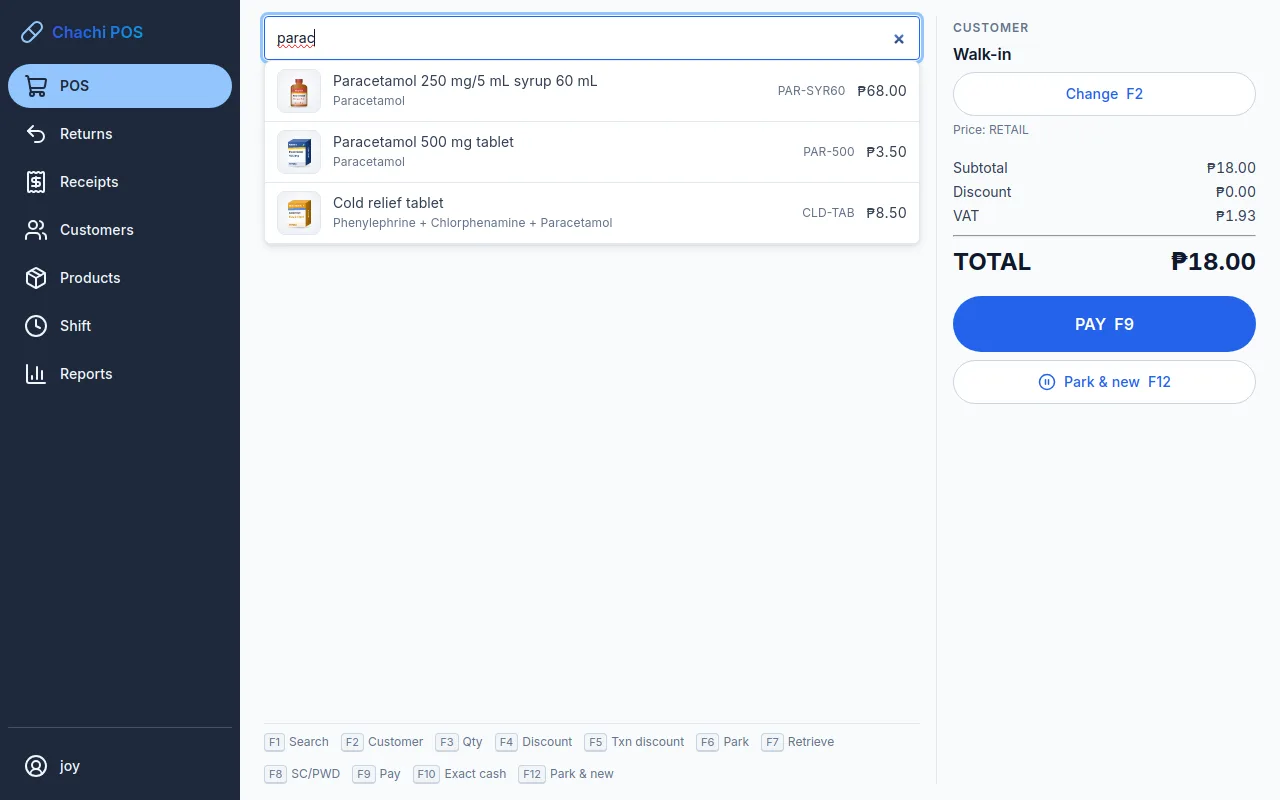
- Type at least two letters in Scan or search (press F1 to jump there). You can type the brand, the generic name (for example parac for paracetamol), the SKU or part of the barcode.
- The results show each product's picture, its name, the generic name under it, the SKU and the retail price.
- Click the right product. It is added as one unit.
If the barcode is not found
A bar appears: … is not in the catalogue. Nothing is added.
- Search for the item by name and sell it that way.
- Afterwards, ask the owner, a manager or the inventory clerk to attach the barcode to the product (Attach … to a product reminds you how). See Products and prices.
- Click Dismiss to hide the bar.
A barcode printed by a weighing scale (with the weight inside the number) cannot be read by this version. The app says so; search by name instead.
If a product has been withdrawn, or has no retail price yet, it cannot be sold and the app says why.
Change the quantity, the unit, or remove a line
Who: Cashier, Manager or Owner
The keys below work on the selected line (the highlighted one). Click a line to select it. A line you just added is already selected.
- Press F3 or tap Qty. A Quantity panel opens for that line.
- Type the quantity in Quantity.
- If the product is also sold in packs, choose the Unit: the single unit (for example TAB) or a pack (for example BLISTER or BOX). Under the field the app shows what that comes to, for example 2 BOX = 200 TAB.
- Click Apply (or press Enter). The line and the total update.
- Selling a pack or single pieces: to sell 3 tablets out of a box, leave the unit on TAB and type 3. To sell a whole box, choose BOX and type 1. The line shows both, for example 1 BOX (100 TAB).
- Parts of a unit: some units can be sold in parts (for example 0.5 of a kilo). Units that cannot are marked under the field: … cannot be sold in parts — a whole number of them.
- Remove a line: select it and press Delete or tap Remove line.
- Close a panel without changing anything: press Esc or click Cancel. Esc never clears the cart.
Tip: Watch stock after on each line. If it goes below zero, the shelf does not have enough and the sale will be refused at payment (see If the sale will not complete).
Choose a customer and price level
Who: Cashier, Manager or Owner
A sale without a customer is a Walk-in and is charged the RETAIL price. Choose a customer when they buy on credit, pay with store credit, or get a special price.
- Press F2, or click Change under Customer.
- Type at least two letters of the customer's name, code or number in Search.
- Click the customer. Each result shows their price level and, if they buy on credit, the credit still available.
The whole cart is priced again for that customer. Each line names the price used:
- RETAIL, WHOLESALE or DEALER — the customer's price level. If a product has no price at their level, it is sold at retail.
- AGREED — a price agreed with this customer for this product.
- A number such as 10+ — a quantity price, for buying that many or more.
To go back to a walk-in sale, press F2 and click Walk-in. If the customer is already at their credit limit, the app warns you when you choose them. To add a new customer or change a price level, see Customers and utang.
Give a discount
Who: Cashier, Manager or Owner, each up to their own limit; above it a manager or owner approves
On one line
- Select the line and press F4 or tap Discount.
- Type the discount in pesos in Amount in pesos (for example 5 for ₱5 off the line).
- Click Apply. The line shows Discount -₱5.00.
On the whole sale
- Press F5 or tap Txn discount. The Transaction discount panel opens.
- Type the amount in pesos and click Apply. It is shared across the lines and shown in Discount on the right.
Discount limits and manager approval
Each role may give a discount up to a percentage of the line (or of the sale). The store starts with Cashier 2%, Manager 5% and Owner 100%; the owner can change these in Settings (Users, settings and backups).
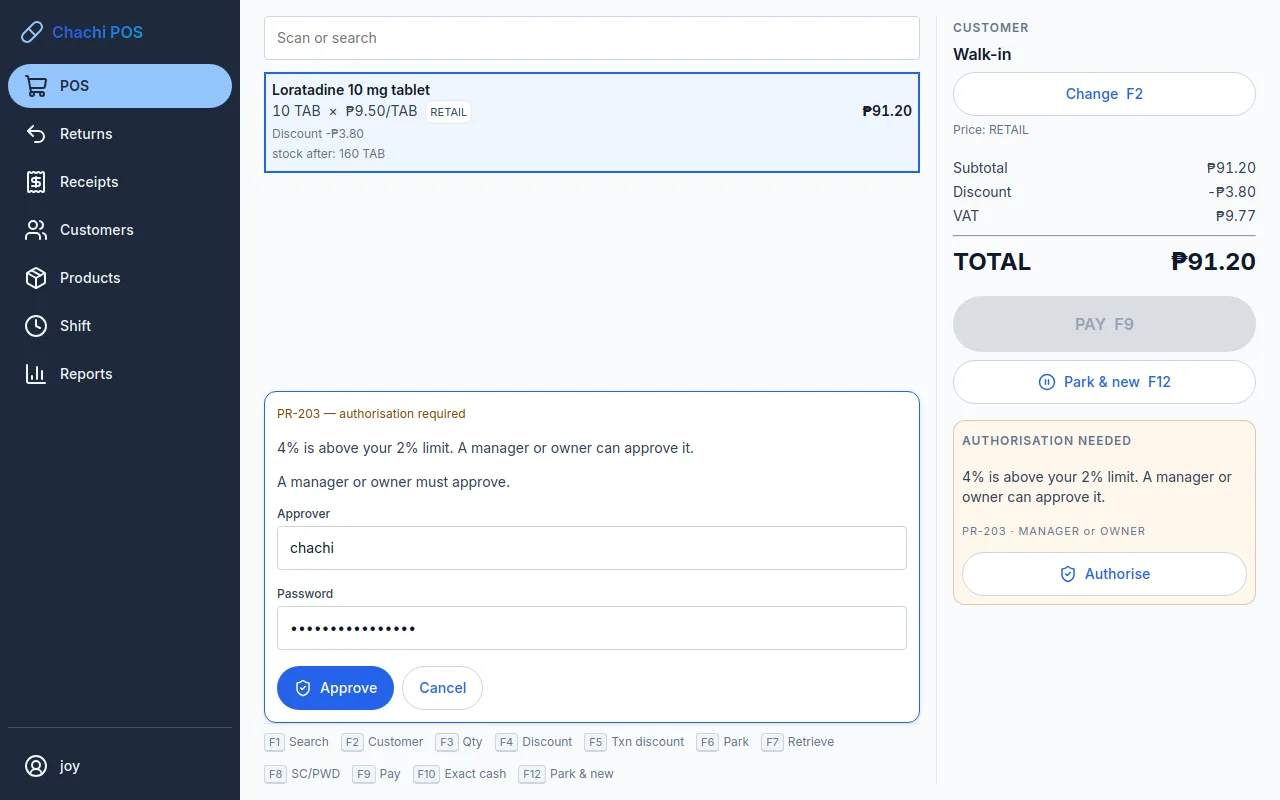
If your discount is above your limit, the sale is not refused. Instead, Authorisation needed appears on the right with the reason (for example 4% is above your 2% limit. A manager or owner can approve it.), and PAY is greyed out until it is approved.
- Call the manager or owner to the counter.
- Click Authorise (or press F9).
- The manager types their own username in Approver and their own password in Password, then clicks Approve. The cashier stays signed in.
- The payment screen opens. The sale records both names. The approval is good for 5 minutes and this one sale (see "The approval has expired").
- A manager above 5% needs the owner to approve.
- Below cost: if a discount would sell an item for less than it cost the store, a manager or owner must approve it the same way (… is below the … average cost).
- Category cap: the owner can set a maximum discount on a category (see Products and prices). If your discount is above that cap, nobody at the counter can approve it — lower the discount.
- Automatic discounts: a quantity price or a basket discount set by the owner applies by itself; the right side names the basket discount. If you also type a discount, the customer gets the larger of the two, never both, and the screen says which one applied.
Give a senior citizen or PWD discount
Who: Cashier, Manager or Owner
The 20% discount for senior citizens (RA 9994) and persons with disability (RA 10754) is switched on when a pharmacy is set up. It applies only to products marked for it in the product editor (Products and prices); new products start marked.
- Ring up the items as usual.
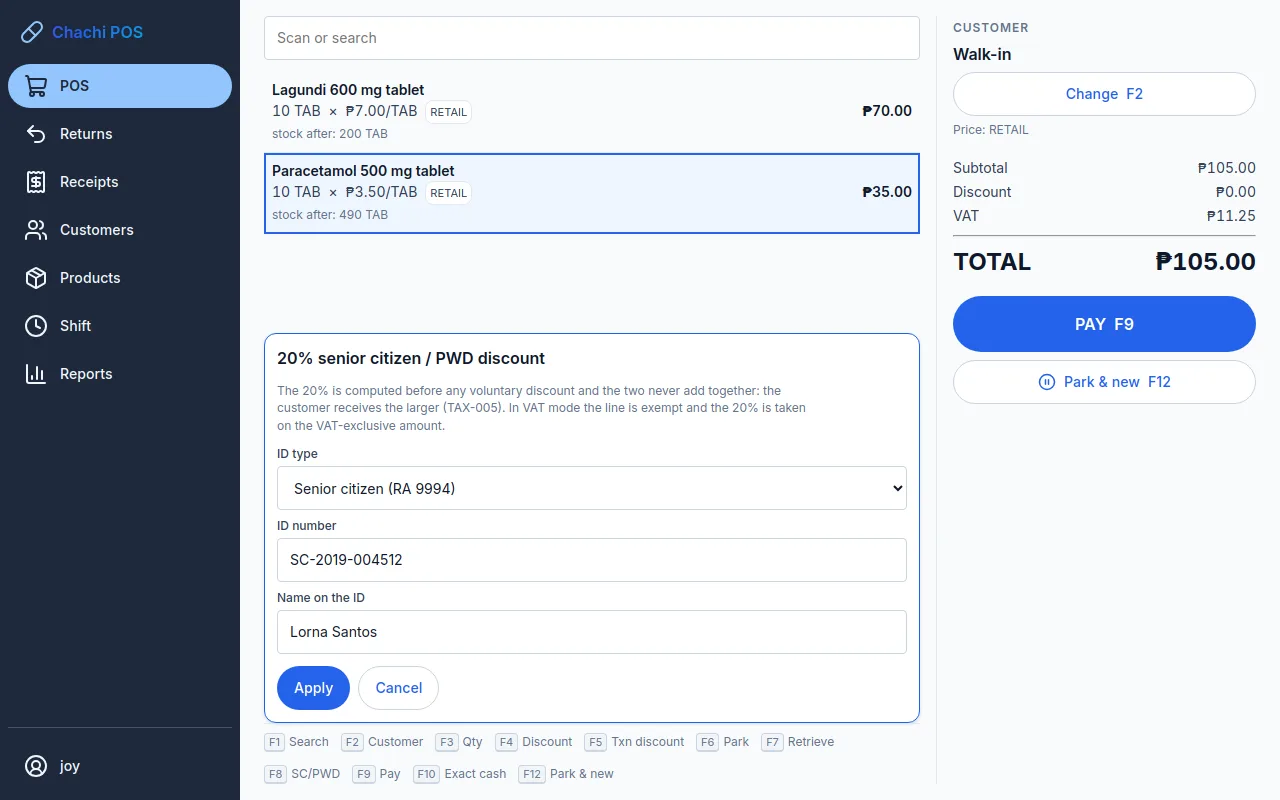
- Ask for the customer's ID and press F8 or tap SC/PWD. The 20% senior citizen / PWD discount panel opens.
- Choose the ID type: Senior citizen (RA 9994) or PWD (RA 10754).
- Type the ID number and the Name on the ID, exactly as on the card. Both are required.
- Click Apply.
What you will see:
- Each eligible line shows SC/PWD -₱…. In a VAT-registered store it also shows VAT-exempt, less ₱… VAT: the line is sold without VAT and the 20% is taken from the price without VAT.
- The right side shows its own SC/PWD 20% row and, under it, the ID type, name and ID number. The payment screen repeats the name and number — read them back to the customer.
- If a line already had a bigger store discount, the customer gets the larger one, never both; the line says so. A whole-sale discount (F5) is not given on the SC/PWD lines.
The receipt shows SC disc (or PWD disc) under each eligible line — after Less VAT in a VAT-registered store — then the discount total, and at the bottom the ID number (SC ID … or PWD ID …) and the name. The app records the ID type, number and name only.
- If no item in the cart is eligible, the app says None of these products is eligible… and no discount is given.
- To remove it, press F8 or tap SC/PWD and click Remove.
- A parked sale does not keep the ID. When you resume it, press F8 or tap SC/PWD and enter the ID again.
- If the 20% would sell a line below cost, a manager or owner must approve it, as for any discount.
Agrivet store: the discount is switched off when the store is set up, and F8 is not shown in the key bar until the owner turns it on in Settings.
Park a sale and resume it
Who: Cashier, Manager or Owner
Park a sale when the customer steps away (to get another item, or to find money) and you want to serve the next person.
- Tap Park & new (F12), or Park (F6). The cart is set aside and you see Parked: with the number of lines and the time. The counter is empty for the next customer.
- When the customer comes back, press F7 or tap Retrieve.
- Under Parked carts, click the right one. Its lines and customer come back.
- If you had items in the cart when you retrieve, they are parked for you: Your cart was parked as ….
- A resumed sale is priced at today's prices, not the prices when it was parked.
- Parked carts are cleared when your shift closes, so finish any you still need before closing.
In a café: take the order, send it to the kitchen, be paid later
Who: Cashier, Manager or Owner, in a store set up as Café / Restaurant
A table orders, eats, and pays when it leaves. The counter keeps each order open until it is paid, and the kitchen gets a ticket for it.
- At the top right, choose Dine-in, Take-out or Delivery, and type the table or the customer's name, for example Table 4 or Ana.
- Add the items as for any sale. To tell the kitchen something about a line, select it and tap Note, for example less ice. The note shows under the item, and a second latte without the note is a line of its own.
- Tap Send to kitchen (F6). The kitchen ticket prints with the order number, the table and every item and note, with no prices. The counter is cleared for the next table, and Order 12 — Table 4 sent to the kitchen is shown.
- When the table orders more, tap Orders (F7), choose the order, add the items and tap Send changes. The kitchen gets only what changed: + 1 x Iced Latte for more, - 1 x Bibimbap for something the customer no longer wants.
- When the table pays, open the order from Orders and tap PAY. Anything added at the counter and not yet sent goes to the kitchen with the receipt.
- A take-out paid at once needs no sending: choose Take-out, add the items and tap PAY. It still gets an order number, and the kitchen still gets its ticket.
- If the owner has set a service charge, a dine-in bill shows it under the discounts, and it prints on the receipt. Take-out and delivery have none.
- To call an order off before it is paid, tap Cancel… beside it in Orders and say why. The kitchen gets a ticket saying the order is cancelled, and the owner can see who cancelled it and why in the audit trail.
- Ticket beside an order prints the whole order again, marked REPRINT, for a ticket that went missing in the kitchen.
- Open orders stay open when a shift closes, because the table is still eating. The closing screen says which ones, and the next cashier is paid for them.
- An order is kept on the device where it was taken. On the web and a phone together, open it on the one it was sent from.
Take payment: cash, GCash, QR Ph, split, store credit
Who: Cashier, Manager or Owner
Press F9 or click PAY. The Payment screen shows the Amount due, then one row per payment you add, then Tendered and Remaining (or Change). The buttons CASH, GCASH, QRPH and CREDIT add a payment row.
Cash
- Click CASH. The amount starts at what is still due.
- Change it to the amount the customer handed you (for example 1000). Change shows what to give back.
- Click Complete or press Enter. If a cash drawer is connected, it opens.
Tip: For exact money, press F10 on the payment screen: it adds one cash payment for exactly the amount due. Then press Enter.
GCash or QR Ph
- Click GCASH or QRPH.
- Type the amount.
- Look at the customer's phone and type the Reference number from their confirmation. Never make one up.
- Click Complete.
The row shows RECORDED: the app does not connect to GCash or the bank, so it only records what you saw. If the same reference was already used today, the app asks you to tick Used today already — confirm this is a second payment. Tick it only if it really is a second, separate payment; usually it means the reference was typed twice.
Split payment
Add as many rows as you need, for example ₱200 GCASH and the rest CASH. Remaining shows what is still due. Only cash can be more than the amount due (to give change). To remove a row, click the × at its end.
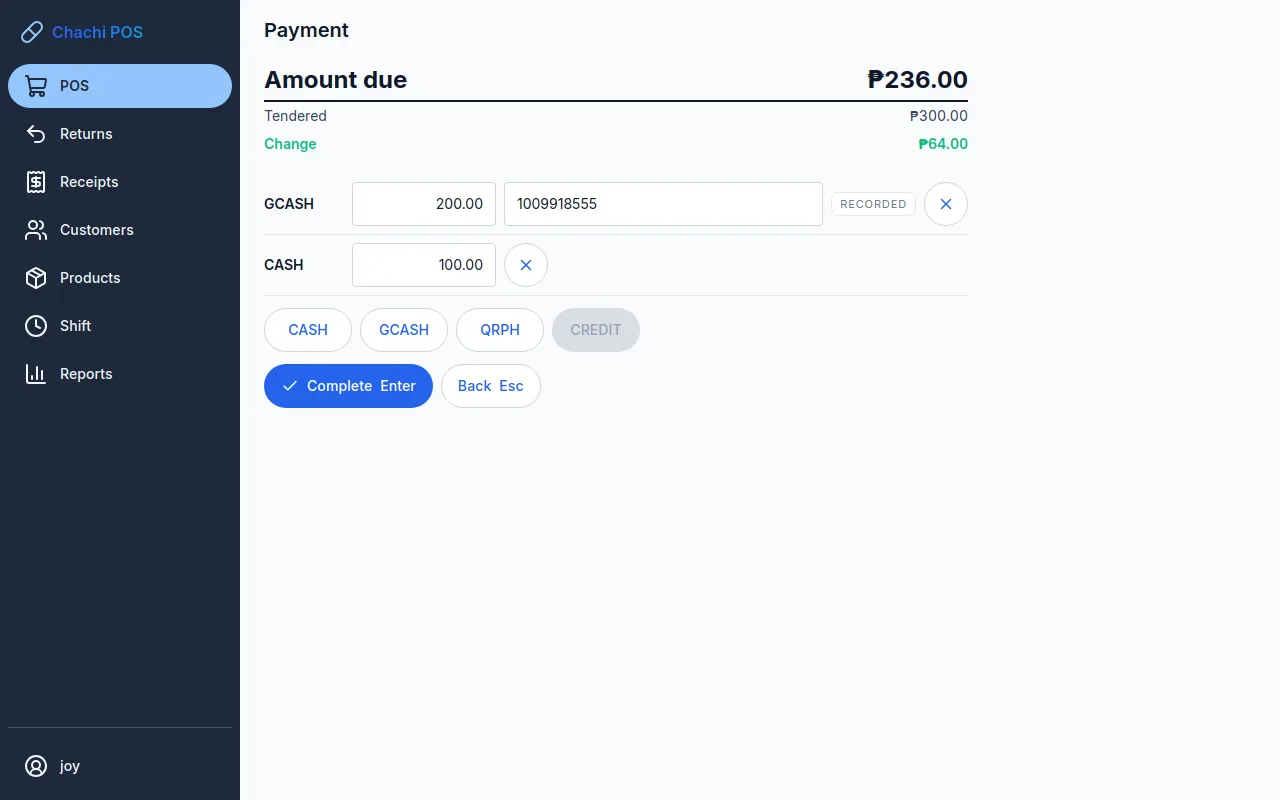
Paying with store credit
If the store owes the chosen customer money (for example from a return), a button such as STORE CREDIT ₱400.00 appears. Click it: it covers as much of the bill as the balance allows. Take the rest another way.
Why Complete is greyed out
The reason is written under the payment rows: Add a payment to continue., Enter the GCASH amount., A GCASH payment needs its reference number., The payment does not cover the total yet. or Only cash may be over-tendered. Reduce the other payments.
Card payments are not available. Press Esc or click Back to return to the cart without losing it.
Sell on credit (utang)
Who: Cashier, Manager or Owner
Only a registered customer who is set up for credit can buy on credit. A walk-in cannot: the CREDIT button is greyed out.
- Press F2 and choose the customer before paying.
- Press F9. The payment screen shows the customer's credit: Limit, Balance and Available.
- Click CREDIT and type the amount going on their account. Add a CASH row for any part they pay now.
- Click Complete.
The receipt shows the amount as CREDIT RECORDED, and it is added to what the customer owes. Collecting payments and printing statements are in Customers and utang.
If the customer is over their credit limit
The payment screen warns: This sale is more than their available credit. Put up to ₱… on CREDIT, or a manager or owner approves the rest when you press Complete.
- Put the amount on CREDIT and press Complete. A box headed CR-104 — authorisation required opens under the payments. It says how much credit the customer has left and how far over their limit this sale takes them.
- The manager or owner types their own username in Approver, their own password in Password, and in Reason why the customer may go over (for example Pays every Friday; owner agreed).
- They click Approve. The sale completes and the receipt prints. The audit trail records the cashier, the approver and the reason.
The approver must be a manager or owner, and not the person selling. A cashier's name is refused in the box: … is a cashier and cannot approve this. A manager or owner must. A manager's approval for a discount on the same sale does not cover going over the limit, so the box asks again. Cancel closes the box and keeps the sale on the screen.
Instead of an approval you can put only the available amount on CREDIT and take the rest in cash, GCash or QR Ph, or a manager or owner can raise the limit (Change a credit limit).
If the customer is not set up for credit, the sale is refused with … is not set up for credit.
The receipt
Who: Cashier, Manager or Owner
When the sale completes, the receipt screen shows the sale number (for example SALE-20260915-000031), the Total, the Change and a preview of the receipt. The sale is saved at this moment.
The printed receipt is headed TRANSACTION RECORD and ends with the words This is not an official receipt. It is the store's own record for the customer, not a BIR official receipt or sales invoice. A VAT-registered store also gets a VAT summary. GCash, QR Ph and credit payments print with the word RECORDED; GCash and QR Ph also print their reference number.
- The receipt prints by itself as the sale completes. Under the preview you see Receipt printed. Hand it to the customer.
- Press Enter or click New sale for the next customer.
To print it again later in the shift, or to cancel the sale, see Returns, voids and reprints.
If the printer does not print
The sale is already saved and nothing is lost. Under the preview the app says why, for example The receipt did not print: the printer is not connected — check its cable and that it is switched on. Do not ring the sale up again.
- Fix the printer: paper, cable, power (see Troubleshooting).
- Click Print it, beside the message. The customer gets the receipt as it should have printed, without a REPRINT mark.
Print it works once, for a receipt that did not come out. Any copy after that is a reprint, marked *** REPRINT ***. If no printer is set up at all, the screen says No receipt printer is set up and the receipt is on screen only; the owner connects one in Users, settings and backups.
If the sale will not complete
Who: Cashier, Manager or Owner
The app checks the sale again when you click Complete. If it refuses, the reason appears on the payment screen and nothing is saved. Press Esc to go back to the cart and fix it.
- Not enough stock: Not enough … There is … on hand and this sale needs … Lower the quantity or remove the line, and tell the manager — the stock figure may need correcting (Stock, expiry and counts).
- Expired stock: the app always sells the batch with the earliest expiry date first, and it never sells an expired batch. If only expired stock is left, it says … is on the shelf but expired … and may not be sold. Nobody can override this. Take the expired stock off the shelf and tell the manager (Stock, expiry and counts).
- Recalled stock: a batch on recall is never sold. If only recalled stock is left, it says … is on the shelf but recalled (batch …) and may not be sold. Take it off the shelf. Take those boxes off the shelf and give them to the manager (Recall a batch).
- Prices changed: The screen showed ₱… but this sale comes to ₱… A price was changed while you were selling. Go back to the cart, check the new total with the customer, and pay again.
- No shift: Open your shift before you complete a sale. See Open your shift.
Selling when the internet is down
Nothing changes. The counter, payments, receipts and the cash drawer all work without the internet, and there is no offline warning on the counter screen. GCash and QR Ph payments are recorded from the reference number on the customer's phone, so they work too.
The app only needs the internet to check the store's subscription, at least once every 30 days. See Troubleshooting for subscription warnings.
Keyboard shortcuts
The buttons at the bottom of the counter screen carry their keys (F3 to F8, and Del); the other keys are listed under them.
| Key | On the key bar | What it does |
|---|---|---|
| F1 | Search | Jump to the Scan or search box |
| F2 | Customer | Choose a customer, or go back to Walk-in |
| F3 | Qty | Change the quantity and unit of the selected line |
| F4 | Discount | Discount the selected line, in pesos |
| F5 | Txn discount | Discount the whole sale, in pesos |
| F6 | Park | Park the sale |
| F7 | Retrieve | Bring back a parked sale |
| F8 | SC/PWD | Senior citizen or PWD discount (shown only when the store grants it) |
| F9 | Pay | Go to the payment screen |
| F10 | Exact cash | On the payment screen: add one cash payment for exactly the amount due. On the counter screen it opens the payment screen, like F9. |
| F12 | Park & new | Park the sale and start a new one |
| Delete | — | Remove the selected line |
| Esc | — | Close the open panel or search list. Never clears the cart. On the payment screen: back to the cart. |
| Enter | — | On the payment screen: Complete. On the receipt screen: New sale. |
On a phone or tablet
The counter works the same way on a narrow screen, arranged differently:
- On a phone, or a tablet held upright, the cart is on top and the TOTAL and PAY are underneath it, with the customer below them.
- On a phone, the menu is behind the ☰ button at the top left.
- On a touch screen, the key names are hidden and every action is a button: tap a line to choose it, then Qty, Discount, SC/PWD or Remove line. PAY, Park & new and Change (customer) are buttons too.
On Android: everything at the counter is done by touch, with the buttons at the bottom of the cart; no keyboard is needed. A USB or Bluetooth barcode scanner in keyboard mode works as on a PC; scanning the same item again adds one more.