
Products and prices
Bring your product list in from one Excel workbook, then find, add and change products one at a time: their prices, barcodes, pictures, categories and brands.
Load your products from the opening workbook
Who: Owner
When the store starts on Chachi POS, you can bring in everything at once: categories, units, brands, suppliers, products, packs, the stock on the shelf and what customers owe. You do it with one Excel workbook that you download from the app, fill in and send back. You can do it in step 6 of the setup wizard (6 · Your data) or later, from Admin → Export / import, under Load opening data.
- Open Admin, then Export / import, and go down to Load opening data.
- Click Download the Excel template. The file pharmacy_opening_template.xlsx is saved on the computer.
- Open it in Excel and read the Read me tab first. On every other tab, row 1 is the column name and row 2 says whether the column is required, with an example. Type your own data from row 3 down.
- Fill in the tabs you need, in this order: Categories, Units, Brands, Suppliers, Products, Packs, Opening stock, Credit balances. Leave a tab empty if you have nothing for it.
- Save the file as it is, as an Excel Workbook (.xlsx). Do not rename the tabs or the columns.
- Back in the app, under Choose the filled-in workbook, choose the file.
- In Cutover date, choose the day you stopped using the notebook. Opening stock and balances are dated on that day. Leave it blank for today.
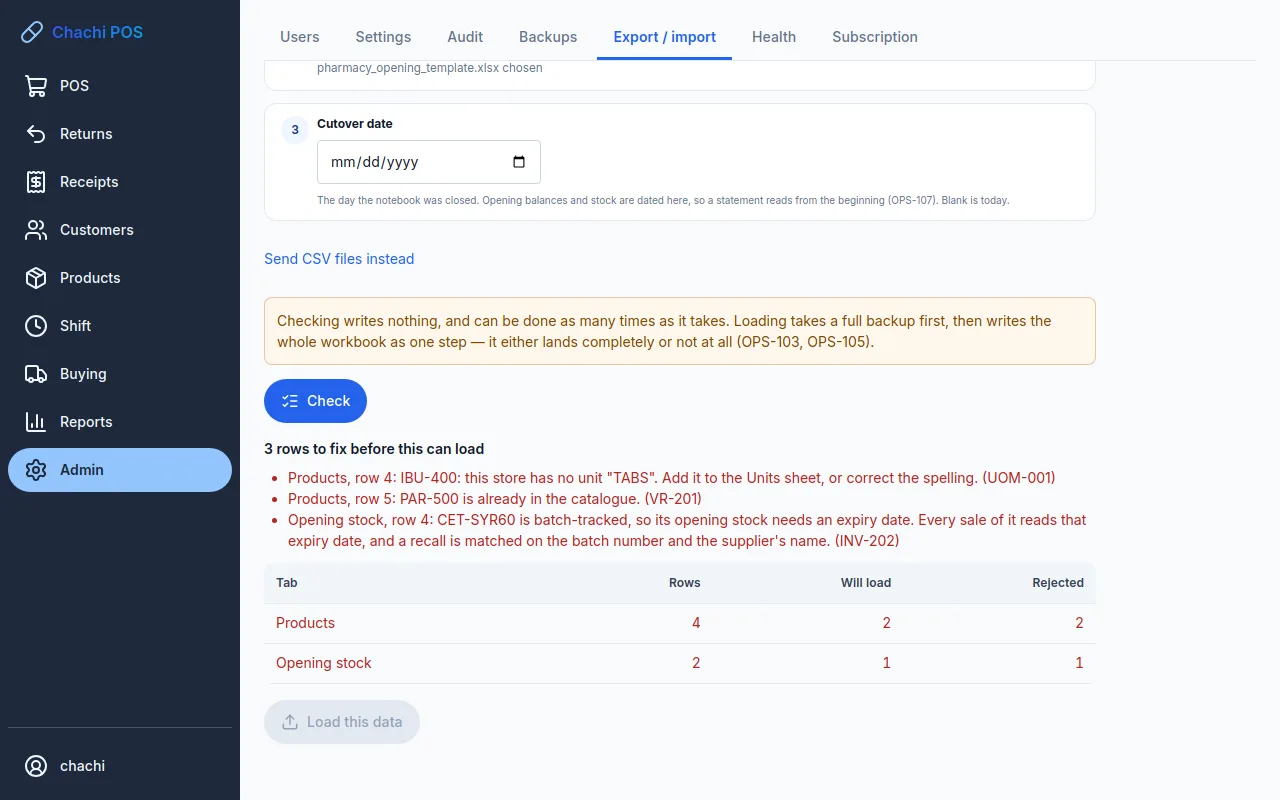
- Click Check. Checking writes nothing, so you can do it as many times as you need.
- Read the report. It says Ready to load, or how many rows to fix, and names the tab and the row of each problem, for example “Products, row 7: …”. Fix those rows in Excel, save, choose the file again and click Check again.
- When the report says Ready to load, read the notes under it, then click Load this data.
The app takes a full backup first, then loads the whole workbook in one step: either all of it goes in or none of it does. The result says what was loaded and names the backup file. If the load was a mistake, restore that backup from Admin → Backups (see Restore a backup).
What goes on the Products and Opening stock tabs
| Tab | Required columns | Optional columns |
|---|---|---|
| Products | sku, name, category, base_unit, retail_price | generic_name, brand, wholesale_price, dealer_price, tax_class, min_stock, barcode, batch_tracked, senior_pwd |
| Packs | sku, unit, contains | default_sell, barcode (the code printed on the pack, so scanning it adds a whole pack) |
| Opening stock | sku, quantity, unit_cost | note, batch_no, expiry_date, supplier (all three required for a batch-tracked product) |
Write “yes” under “batch_tracked” for goods sold by expiry date (medicines, vitamins) and under “senior_pwd” for goods the senior citizen / PWD discount covers. A blank cell means no. Write dates year first, like “2027-03-31”. Quantities are in the product's base unit: 1,000 tablets, not 10 boxes.
Common problems in the check report
| The report says | What to do |
|---|---|
| this store has no unit “TABS” | Add the unit to the Units tab, or fix the spelling so it matches. |
| this store has no category “…” | Add it to the Categories tab. A product row never creates a category by itself. |
| no retail price | Every product needs a retail price, or it could not be sold. |
| PAR-500 is already in the catalogue | That product was loaded before. Delete its row from the Products tab. |
| … is batch-tracked, so its opening stock needs a batch number, an expiry date, a supplier | Fill in batch_no, expiry_date and supplier on the Opening stock row. |
| … is not an expiry date. Write it as YYYY-MM-DD | Retype the date year first, for example 2027-03-31. |
| … no unit cost | Find what the stock cost you and type it in. |
| … is also on line 12 | The Opening stock tab takes one row per product. Put the whole quantity on one row. |
Important: get “unit_cost” right. Every sale keeps the cost that applied when it was made, so a wrong opening cost makes every profit figure wrong and cannot be fixed afterwards. A cost of zero loads, with a note, because free samples happen.
Tip: an expiry date that has already passed still loads, with a note. That stock cannot be sold. Write it off afterwards (see Write off expired or damaged stock).
Because the Opening stock tab takes one row per product, it loads one batch of each product. Pictures are not in the workbook; add them product by product (see Add a picture of the product).
If you already keep your lists as CSV files, open Send CSV files instead. Each tab has its own file and its own Template button. Choosing a CSV file sets the workbook aside, and choosing a workbook sets the CSV files aside.
Agrivet store: the spreadsheet is the same. Its examples are feeds and sacks instead of medicines, and customers from the credit balances tab are given the type Farm.
Find a product
Who: Owner, Manager, Inventory or Cashier (a cashier can look but not change anything)
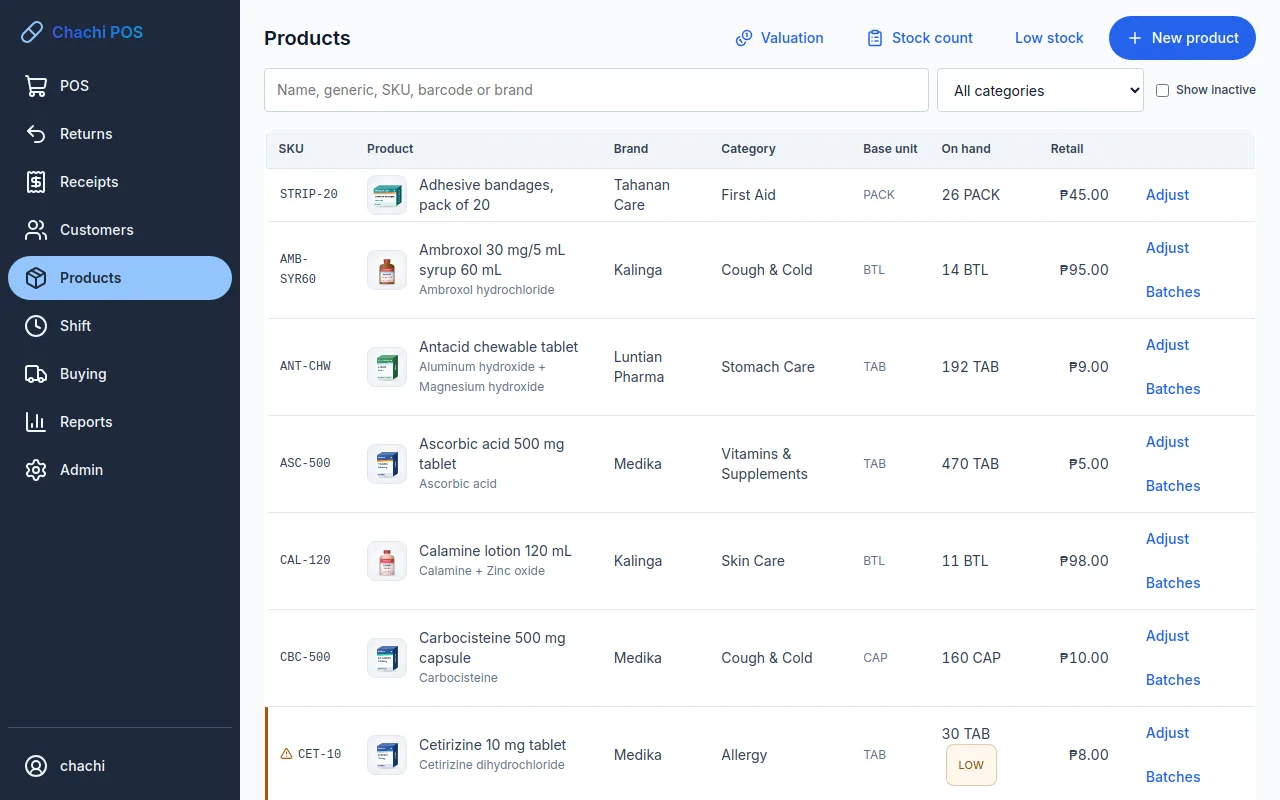
- Click Products in the menu on the left.
- Type in the search box. It finds a product by name, generic name, SKU, barcode or brand, so “parac” finds every brand of paracetamol.
- To see one shelf only, choose it in All categories.
- To see only what needs reordering, click Low stock. Click All products to go back.
- To include products you stopped selling, tick Show inactive.
- Click a row, or press Enter on it, to open the product.
Each row shows the SKU, the picture and name with the generic name under it, the brand, the category, the base unit, the stock on hand and the retail price. A row marked low is at or below its minimum stock. A product marked no price has no retail price and cannot be sold. The list shows 50 products a page; use Previous and Next for more.
Add a product
Who: Owner, Manager or Inventory
- On Products, click New product. Only the Identity tab is shown until the product is saved.
- Fill in the fields (see the table below).
- Click Create product, or press Ctrl+S. The product opens again with all five tabs: Identity, Units, Pricing, Stock and Barcodes.
- On Stock, type the Minimum stock and click Save. At or below this figure the product shows in Low stock. Zero turns the warning off.
- Add packs, other prices and barcodes on the other tabs (see below).
| Field | What to put |
|---|---|
| Picture | Optional. See Add a picture of the product. |
| SKU | Your own short code, like PAR-500. Letters, digits, dot, dash or underscore. Saved in capitals, and no two products can share one. |
| Name | The name customers know, 2 to 120 characters: “Paracetamol 500 mg tablet”. |
| Generic name | The generic on the box, like Paracetamol. Leave it blank if there is none. The counter searches it. |
| Category | Required. Click New category if yours is not in the list. |
| Brand | Optional. Click New brand to add one. |
| Base unit | Required. The smallest thing you sell it in: tablet, capsule, bottle. See Units and packs. |
| Tax class | vatable, vat exempt or zero rated. Ask your accountant which medicines are VAT-exempt. |
| Made to order — no stock is kept | For what the kitchen makes when it is ordered: a meal, a coffee. It sells with nothing on hand, and is never received, counted or low on stock. Leave it unticked for what you buy and sell as it is. Ticked for a new product in a café, unticked elsewhere. |
| Track this product by batch and expiry date | Ticked for a new product. Keep it ticked for anything with an expiry date. Untick it for goods without one, such as cotton balls or a thermometer. |
| The senior citizen / PWD discount applies to this product | Ticked for a new product. Untick it for goods the discount does not cover. |
| Retail price (₱) | Required, per base unit: the price of one tablet, not one box. You can change it later. |
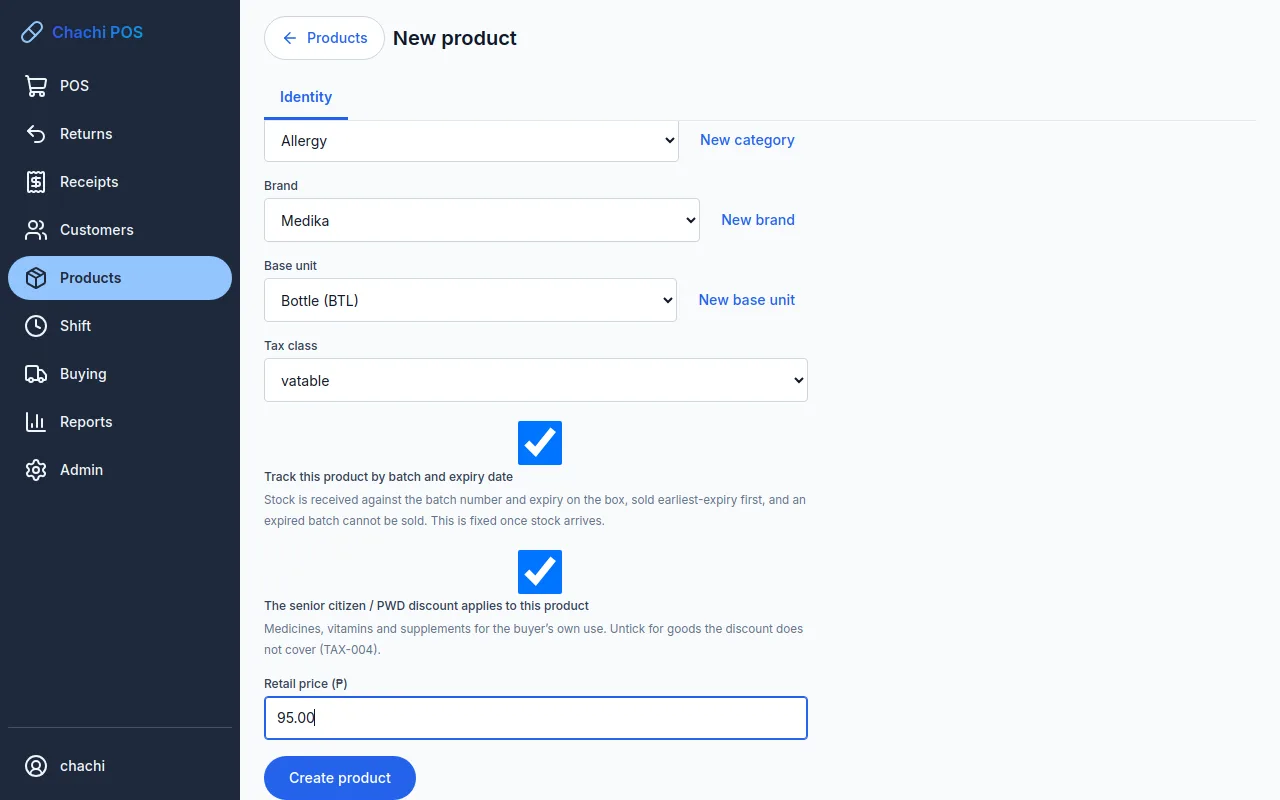
Important: the base unit and the batch-tracking box are locked as soon as any stock moves for the product. After that they cannot be changed, so check both before the first stock arrives.
If saving is refused, the message names the problem: “The SKU "PAR-500" is already used by another product”, or “A product name is 2 to 120 characters”.
| Task | Owner | Manager | Inventory | Cashier |
|---|---|---|---|---|
| Add or change a product, its packs, barcodes and picture | Yes | Yes | Yes | No |
| Change a selling price or quantity breaks | Yes | Yes | No | No |
| See the average cost | Yes | No | No | No |
Agrivet store: a new product starts with batch tracking and the senior citizen / PWD box unticked. Tick batch tracking for vaccines and medicines sold by expiry date before their first stock arrives.
Café / Restaurant: a new product starts made to order, with batch tracking unticked and the senior citizen / PWD box ticked. Untick Made to order for bottled drinks and anything else you buy in and count. A product with stock on hand cannot be made to order until the stock is sold or written off, and a product made to order cannot be batch-tracked.
Choose the unit and the packs
Who: Owner, Manager or Inventory
Every product keeps its stock in one base unit, the smallest thing you sell: a tablet, a capsule, a bottle. Choose it in Base unit on the Identity tab. If you also sell the product by the blister or by the box, add those as packs on the Units tab: pick the unit, type how many base units it holds (100 for a box of 100 tablets) and click Add pack.
How units and packs work at the counter, on deliveries and in stock counts, with a worked example, is in Units and packs.
Set prices and quantity breaks
Who: Owner or Manager
A product has up to three prices, all per base unit: Retail, Wholesale and Dealer. Each customer is set to one of these price levels (see Add a customer). A walk-in pays retail. If a customer's level has no price for a product, the counter charges retail.
- Open the product and click Pricing.
- Type the prices in Retail price (₱), Wholesale price (₱) and Dealer price (₱). A box you leave empty is left as it was.
- Click Save prices. Under each price you see since when it has applied.
A new price applies to sales from now on. Sales already made keep the price they were sold at. The owner also sees Average cost at the top of the tab. It comes from deliveries and the opening stock and is not typed here.
Quantity breaks
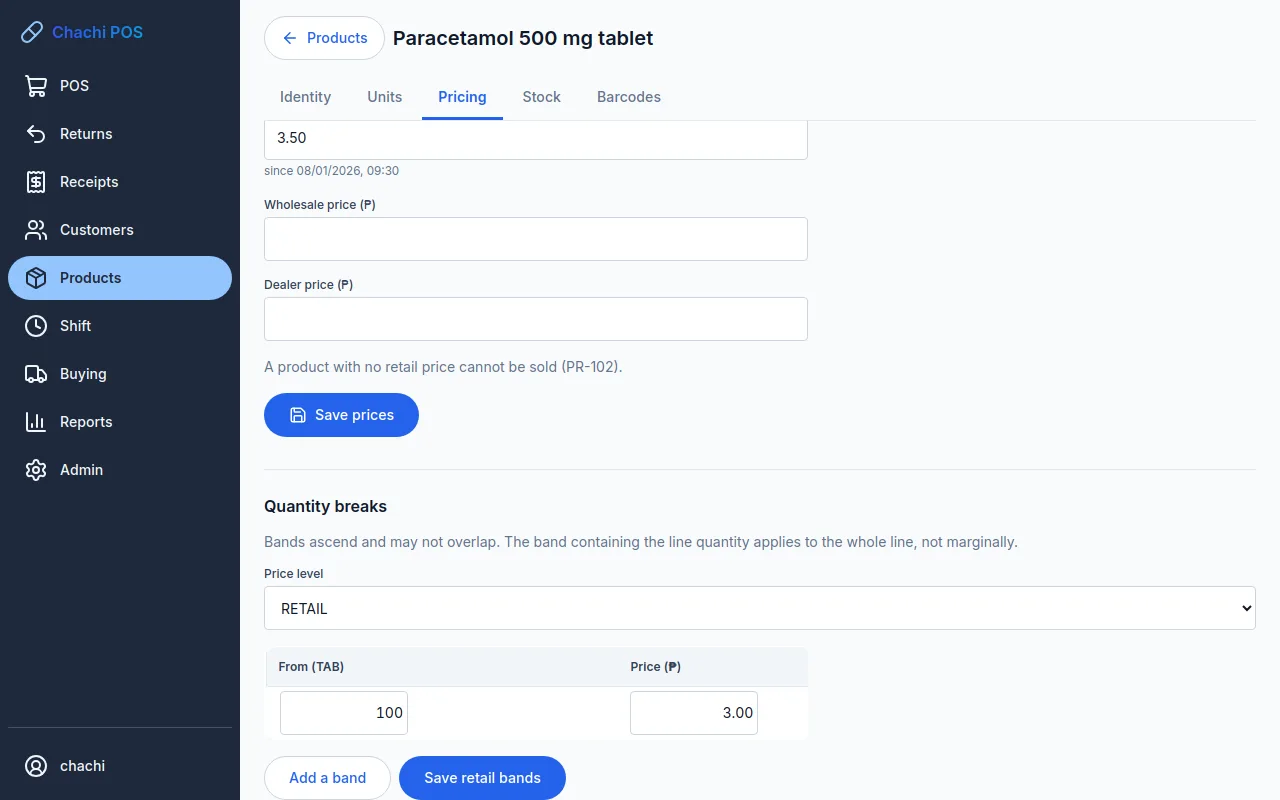
A quantity break is a lower price per unit when a customer buys more. For example, Paracetamol at ₱3.50 a tablet, and ₱3.00 a tablet from 100 tablets.
- On the Pricing tab, under Quantity breaks, choose the Price level.
- In the first row type where the band starts in From (in the base unit, for example 100) and its Price (₱).
- Click Add a band for another row.
- Click Save retail bands (the button names the level you chose).
The band that fits the line's quantity sets the price of the whole line: 100 tablets are all ₱3.00, 99 tablets are all ₱3.50. Each band must be cheaper than the one before it and cheaper than the level price, and no two bands can start at the same quantity. Saving replaces every band at that level; save an empty table to remove them.
Tip: the Pricing tab lets you set a price below the average cost. At the counter, a line that sells below average cost after its discount needs a Manager or Owner to approve it (see Give a discount).
Prices agreed with one customer are not set on the product, and this version has no screen for entering them (see Agreed prices).
Add barcodes
Who: Owner, Manager or Inventory
- Open the product and click Barcodes.
- Click in the box that says “Scan it, or type it” and scan the barcode, or type it.
- If the product has packs, choose in Printed on what the code is printed on: the loose item (for example 1 TAB (loose)) or a pack (for example 1 BOX = 100 TAB). Then click Add.
- The code appears in the list with what one scan adds, and the box is ready for the next one. A product can have several codes, for example one on the box and one on the blister.
- To take a code off, click Remove beside it.
A barcode is at least 4 characters. One barcode belongs to one product only; if it is already used you see “That barcode is already attached to another product.” The in-store labels printed by a weighing scale (13 digits starting with 02 or 20 to 29) are refused, because part of the number is a weight.
Tip: scan the code on the box with Printed on set to the box, and scanning that box at the counter adds a whole box at the box's size, not one tablet. Add the pack on the Units tab first (see Scan the box's barcode).
Important: a code added without choosing a pack adds one loose item. If a box's code does that at the counter, remove it here and add it again with Printed on set to the box.
If the counter scans a barcode that is not in the system
The counter shows “[the code] is not in the catalogue.” with Attach [the code] to a product and Dismiss. The attach button clears the search box so you can find the product by name and sell it; it does not save the code. Afterwards, someone who can edit products opens the product and adds the code on its Barcodes tab. A cashier should write the code down and give it to the manager.
Add a picture of the product
Who: Owner, Manager or Inventory
A picture of the box helps the cashier pick the right product when a customer points at it. It shows beside the name in the product list, in the counter's search results and on the product screen.
- Open the product. The Picture is at the top of the Identity tab.
- Click Add a picture.
- On a computer, choose a photo file (JPEG, PNG or WebP). On Android, take a photo or choose one from the gallery.
- The picture is shrunk and saved straight away; you see “Picture saved”. There is no need to click Save.
- To change it, click Replace picture. To take it off, click Remove and confirm.
On a new product, the picture you choose is saved when you click Create product. If the file is not a picture you see “That file is not a picture. Choose a photo, a JPEG or a PNG.” If a photo is too busy to shrink, you see “That picture is too detailed to save small enough. Try a closer, plainer photo.” Pictures are kept in the store's data, so backups carry them.
On Android: Add a picture offers the camera as well as the gallery, so you can photograph the box at the shelf.
Categories and brands
Who: Owner, Manager or Inventory
Every product has a category, such as Pain & Fever or Vitamins. Categories group the product list, and you can count stock one category at a time. A brand is optional; a product without one shows a dash in the list.
- On the product's Identity tab, click New category (or New brand) beside the list.
- Type the Name and click Save.
- The new category is added to the list and chosen for this product. The rest of what you typed is kept.
Two categories, or two brands, cannot have the same name: you see “"Vitamins" already exists”. You can also list categories and brands on the Categories and Brands tabs of the opening workbook; there a category can also carry a discount ceiling (“max_discount_percent”). There is no screen to rename or remove a category or a brand, so check the spelling before you save.
Stop selling a product
Who: Owner, Manager or Inventory
A product is never deleted, because past sales and stock records point to it. Instead you deactivate it.
- Open the product. On the Identity tab, click Deactivate.
- Read the question “Withdraw [product name] from sale?” and click OK.
- The product is marked inactive.
An inactive product disappears from the product list and the counter's search. Tick Show inactive to see it. If it is still in a cart, the counter refuses it with “[product name] is withdrawn and cannot be sold.” It stays on every past sale and report, and a last delivery of it can still be received.
Important: the product screen has no button to make a product active again, so be sure before you deactivate.